Networking

Each major cloud provider implements the concept of a Virtual Private Cloud (VPC). A VPC gives you as the cloud user an isolated private network, to which you attach cloud compute resources (virtual machines, container orchestrators, etc) or managed resources, like database servers. VPCs are always in private network address spaces and therefore not directly accessible from the outside of the VPC without additional configuration and infrastructure.

Managed EventStoreDB clusters and instances are not accessible via public internet. You have the following options to ensure connectivity between Event Store Cloud and your workloads.

Cloud network peering

Normally, organisations build internal practices in regard to VPCs isolation and access level. In particular, you would expect that some or all VPCs are available for direct access from local networks on-premises, for developers to be able to access cloud resources. Cloud providers let their customers to connect on-premises networks to VPCs using site-to-site VPN connections. In addition, cloud customers often set up virtual private gateways to allow point-to-site VPN connections for their remote users.

Event Store Cloud deploys EventStoreDB clusters on a project-level VPC (network). By peering that network with your own VPC at the same cloud provider, you get access to the EventStoreDB cluster provisioned and managed by Event Store Cloud. Normally, your Ops engineers would be able to configure the routing and allow connecting to EventStoreDB clusters in the cloud.

Currently, peering links have the following limitations:

  • For one peering link you can only specify a single IP range. It means that if your own cloud network has multiple IP ranges, you can only peer one of those. Workloads, which use other IP ranges, won't be able to access managed ESDB instances.
  • For Azure, peering links have the "Allow gateway transit" propertyopen in new window disabled. As the peering link is created from Event Store Cloud side, you cannot change this property. It means that the workload must be connected to the peered VN to access the managed ESDB instance.

We are addressing the limitations listed above in the coming releases of Event Store Cloud.

TailScale

Another options to connect to the cloud cluster is to use a third-party VPN offering, which might be easier to use. One example would TailScaleopen in new window, which is a WireGuard®open in new window based mesh VPN. In addition to the basic functionality of connecting devices in a mesh network, TailGate also allows connecting a subnet to the private VPN. For that, you'd need to provision a VM in the cloud, which is connected to the network peered with Event Store Cloud network. Since that machine would be able to access the EventStoreDB cluster, by configuring the TailScale subnet routingopen in new window you will also make the cluster accessible for all users of your TailScale network.

Check our Tailscale guide for detailed instructions.

Data migration

Currently, the only way to migrate data to the cloud cluster or instance is by using live migration. Live migration can only handle small to medium size databases.

Cluster connection

Event Store Cloud unconditionally provisions secure EventStoreDB clusters with both TLS for TCP and SSL for HTTP and gRPC enabled. This configuration cannot be changed.

Cloud clusters use SSL certificates signed by the trusted public certificate authority and therefore you won't need to do any additional work that is usually associated with self-signed certificates.

After you provision the cloud cluster, you can find connection details for the cluster in the Cloud console.
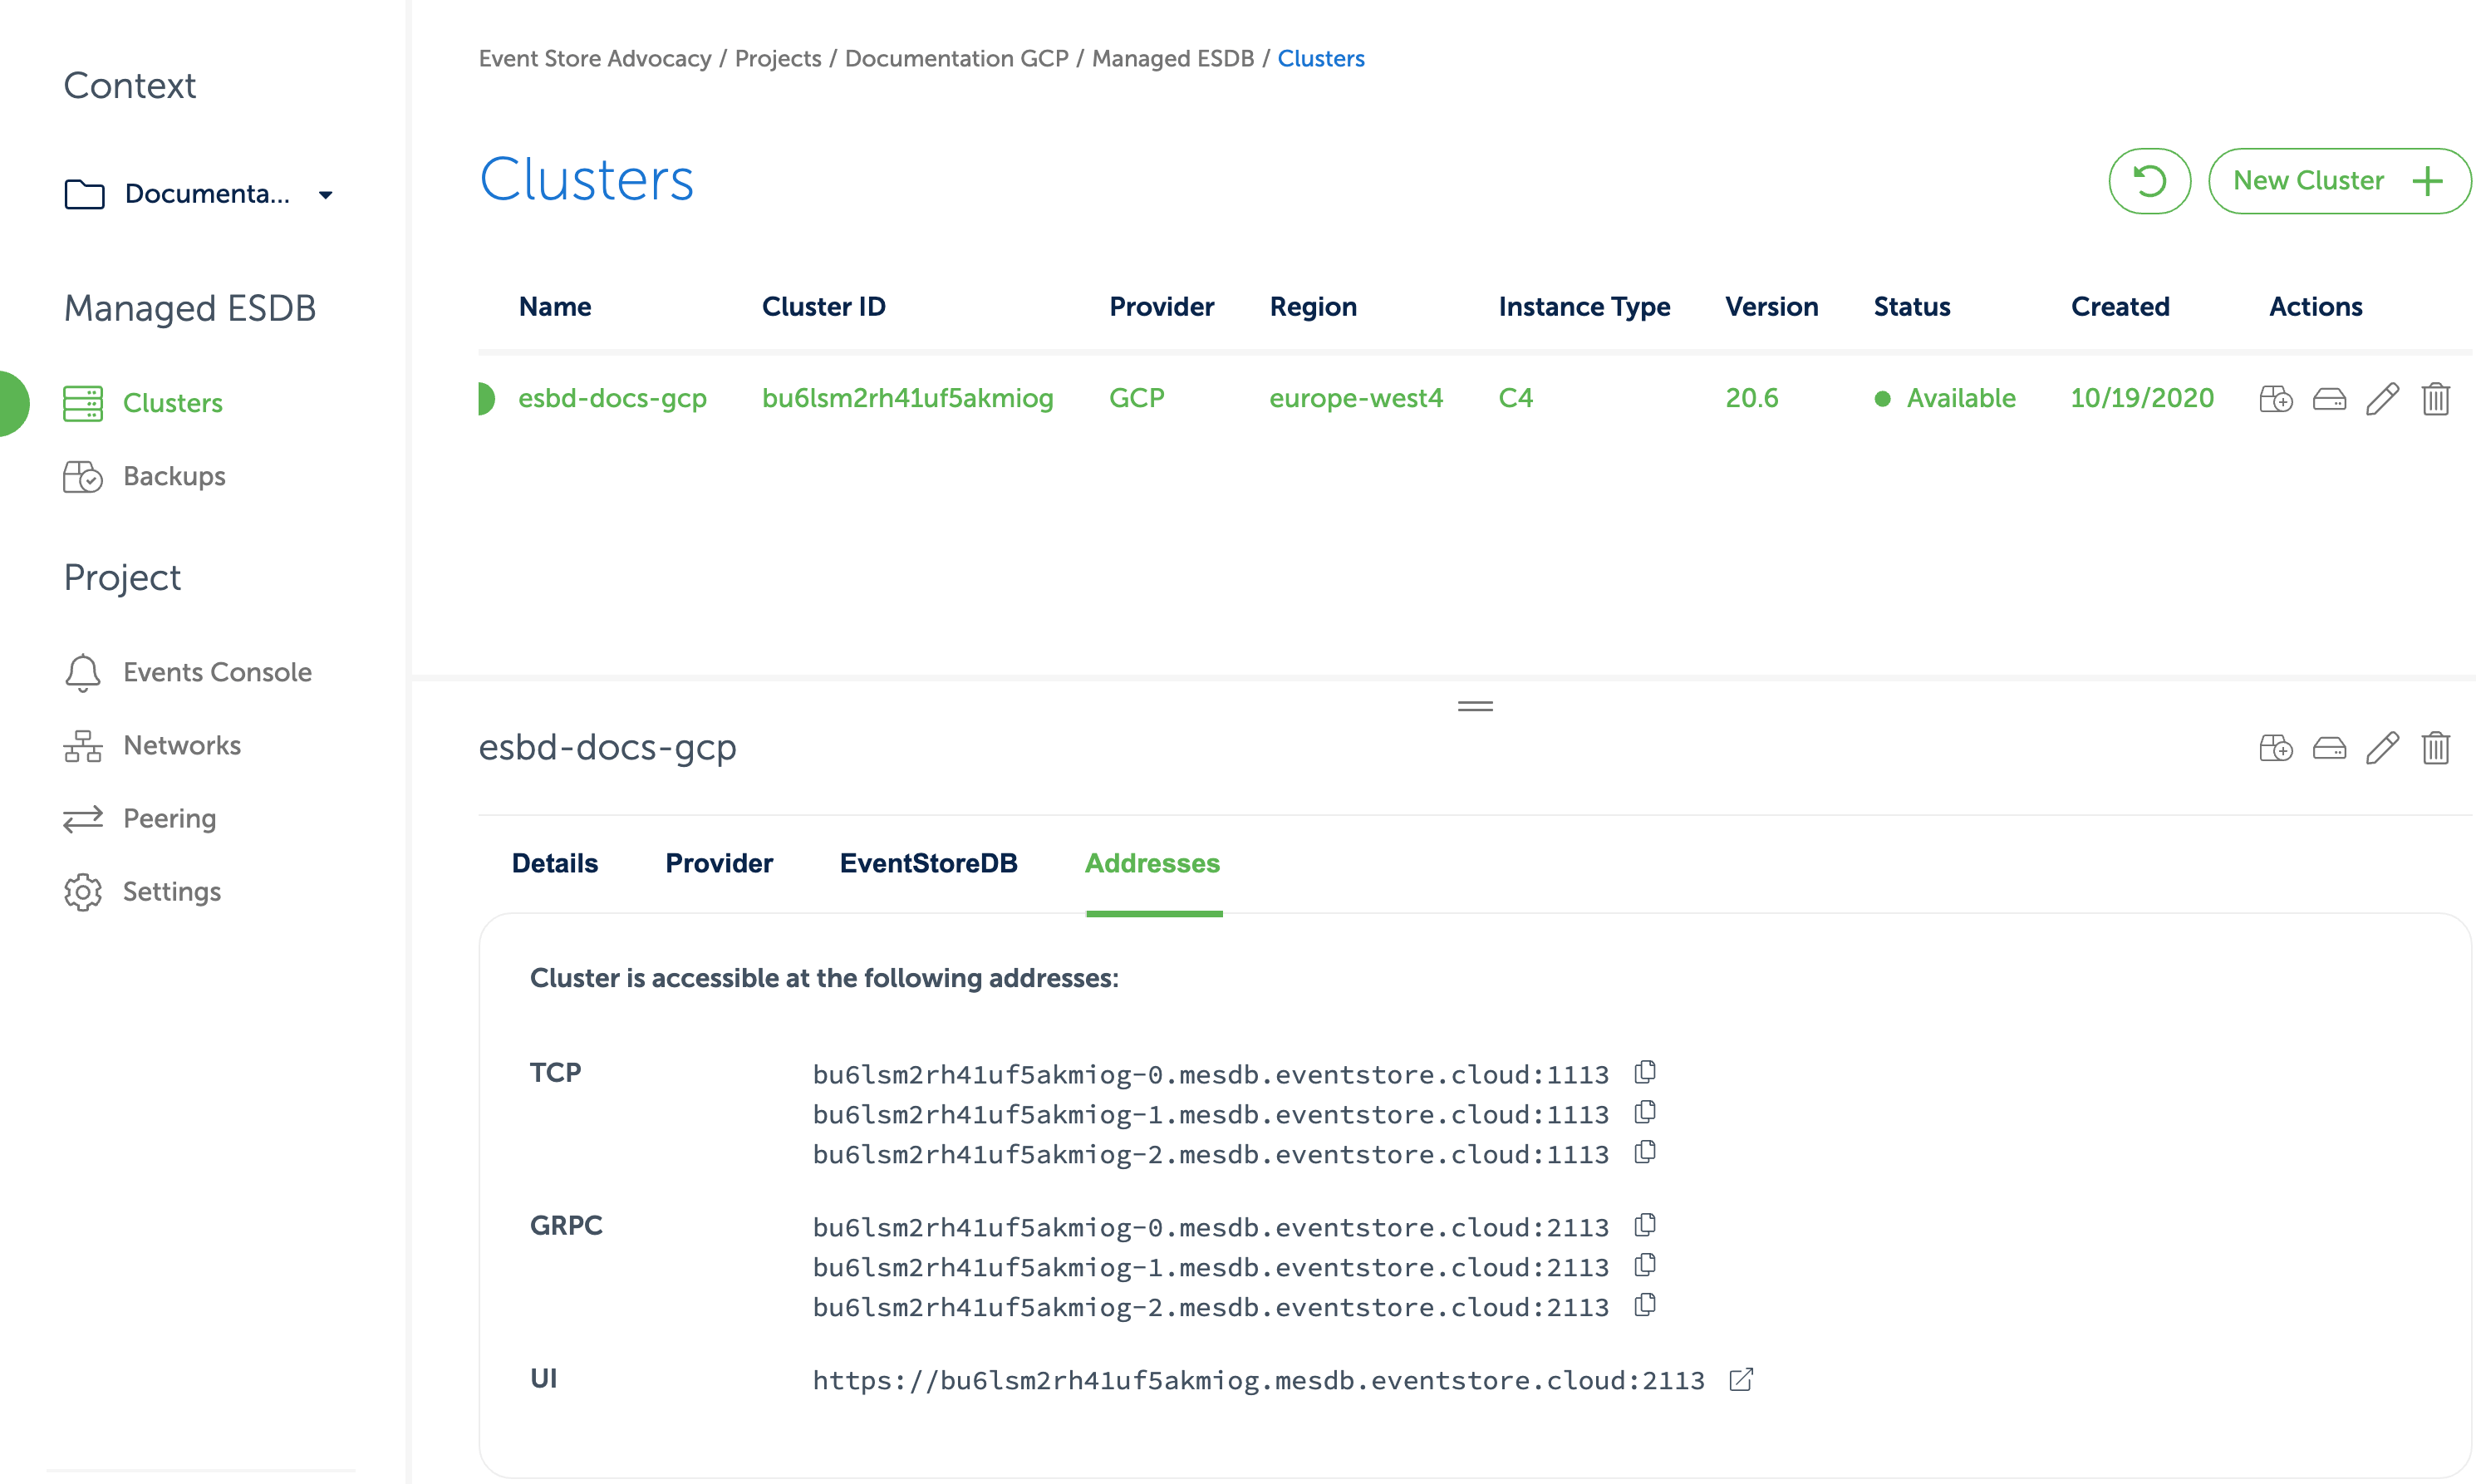
Cluster details

In the cluster details you can find URIs for the EventStoreDB Admin UI and HTTP API, TCP client and gRPC client.

The DNS name of the cluster resolves to IP addresses of all the cluster nodes or to the IP address of a single instance, depending on the deployment topology. When connecting to a multi-node cluster, you'd need to use the seed-based gossip with all the cluster nodes when using 20.6.

For 20.6+ gRPC clients, we advise to use the gRPC connection generatoropen in new window page in the documentation where you can use your cloud cluster ID to get a properly composed connection string.

Each cluster node has its own DNS name, which can be used for accessing individual nodes for node-specific operations like stats collection or scavenging.

Connect with Tailscale

In many organisations which work with the cloud, you can find the connection between the cloud networks and your local network already established using a Virtual Private Gateway or Site-to-Site VPN connection. However, if you're starting on the side and want to keep things simple, you can use Tailscale to connect to the Event Store Cloud cluster.

What is Tailscale?

Tailscaleopen in new window is a commercial product built on top of WireGuard®. It allows you to set up a private tunnel VPN in a mesh-style network. In addition to direct connection, Tailscale also has the subnet routing feature using a gateway machine, which should be connected to the target network.

You can use the Solo plan with Tailscale free of charge.

Get started

First, set up a Tailscale account, then install their client software on your machine. The client will ask you to log in after the installation, and then give you your first machine connected to your private VPN.

Follow the installation instructionsopen in new window to get started.

Provision the cloud VM

Next, you need to create a small VM in the cloud, connected to the VPC with the Event Store Cloud.

You can choose the smallest available instance size, like t4g.nano in AWS, f1.micro in GCP, or Standard B1ls in Azure. For this guide we use Ubuntu 20.04 LTS image (18.04 LTS in Azure).

When creating the VM, make sure you:

  • Connect the default network interface to the VPC peered with Event Store Cloud
  • Enable public IP if you want to connect to the VM from your local machine
  • GCP: enable IP Forwarding on the default NIC
  • AWS: disable Source / destination checking

For existing VMs, you can enable IP forwarding too.

Select the EC2 instance in the list of instances and in the Actions menu choose Networking and then Change source/destination check. Ensure that the Stop checkbox is enabled:

AWS enable ip forward

On GCP you can enable IP Forward only when creating the VM instance.

On the new VM instance page and scroll down to the Management, security, disks, networking, sole tenancy section, expand it, find the Network interfaces section and click on the pen icon. There, set the IP forwarding to On:

GCP enable ip forward

Remember to create the VM instance in the same region as the VPC, which is peered with Event Store Cloud.

Set up Tailscale subnet routing

When you get the cloud VM instance running, connect to it using SSH. The easiest way is to use the cloud browser console.

After logging in, install the Tailscale client for the Linux distribution used for the cloud VM, following the Tailscale guidelinesopen in new window. Here you can also find required steps for Ubuntu 20.04 LTS (focal)open in new window and Ubuntu 18.04 LTS (bionic)open in new window distributions.

When the initial steps are completed, you should be able to ping the cloud VM using its internal IP address from your local machine.

Next, visit the Event Store Cloud console and open the peering page. There you will find the peering you created when following the provisioning guidelines. Write down the details from the Local Address and Remote Address fields.

For this example we will use the following peering details:

Peering page example

With all the necessary details collected, follow these steps on the cloud VM instance:

Enable IP forwarding on the machine:

echo 'net.ipv4.ip_forward = 1' | sudo tee -a /etc/sysctl.conf
sudo sysctl -p /etc/sysctl.conf
1
2

Restart Tailscale client with subnet routing:

sudo tailscale up --advertise-routes=10.164.0.0/20,172.22.101.0/24 --accept-routes
1

In the example above we used both address spaces of both sides of the peering as the advertise-routes parameter values (comma-separated).

Next, visit your Tailscale Admin Console, find the cloud VM in the list and use the three dots popup menu to enable subnet routing and disable key expiry.

Now, visit the Event Store Cloud console, switch to the Clusters page and choose the EventStoreDB cluster. In the cluster details select the Addresses tab and click on the UI link. You should then get the EventStoreDB Admin UI opened in your local machine browser.

This is how the network looks like when using Tailscale:

ES_Cloud_Networking_tailsacle

Future plans

Soon, we want to add out-of-the-box Tailscale network peering, which will create a nano-VM inside Event Store Cloud and set up routing to your Tailscale account automatically.

Migrating data

When replacing a self-hosted EventStoreDB cluster with the managed cluster in Event Store Cloud, you might need to migrate the data, so your workloads can switch to the cloud cluster.

Currently, the only way to migrate data to the cloud cluster or instance is live migration by replication. Live migration is done by reading events from the source database (from $all) using a client protocol (TCP or gRPC) and then writing those events to the target database.

Limitations

Consider the following limitations of live migration to understand if it will work for you.

Write performance

If the target database must get events in exactly the same order as they are in the source database, it's impossible to use concurrent writers. Therefore, the speed of replication will be limited by how much time it takes to append one event to the cloud cluster. For example, if it takes 5 ms to append one event, replicating one million events will take about an hour.

In case your system only requires events to be ordered within a stream, and you have a lot of streams, it is possible to use concurrent writers. As those writers get events partitioned by stream name, the events order in each stream will be kept, but the global order will not. The advantage of using concurrent partitioned writes is performance increase. For example, six writers on a C4-sized instance would give you over 1000 events per second replication speed. In that case, in one hour you can replicate four millions events, not one.

Write load on the source

If the source cluster keep getting new events appended to its database, ensure that the number of events appended to the source database is significantly less than the number of replicated events for a given time period. The goal there is to ensure that the replication process will ever finish. For example, when you see one million new events written to the source cluster per hour, and you observe one million events being replicated per hour, the replication will never finish.

System metadata

When reading events from EventStoreDB, you get several system metadata properties in the event structure on the client side:

  • Event number (position of the event in the stream)
  • Created date (timestamp when the event was appended to the log)
  • Commit position (physical event position in the global log)

The event number in the target database will start from zero, although it could be any number in the source database, if the stream was ever truncated or deleted.

As all the events written to the target database will be "new", the Created date timestamp will be set to the moment when the event was replicated.

Due to the fact that in the source database the global log has gaps caused by deleted or truncated streams, as well as expired events, the commit position in the target database will not be the same for all events.

Effect on workloads

In addition to the points mentioned in the previous section, keep in mind that changes in event number and commit position will affect your subscriptions.

For catch-up subscriptions, you will have to ensure to provide new checkpoints when moving those workloads to the replicated database.

For persistent subscriptions, you'd need to re-create them in the replicated database, with start position that corresponds with the last known persistent subscription checkpoint in the source database.

The same applies for custom JavaScript projections, which emit new events, except of those that emit links.

Links will not be replicated, as all the system events get filtered out (except stream metadata events). Therefore, all the links would normally be recreated. For example, if you use a category projection and $ce streams, those streams will be re-created by the system projection in the target database. In case you have custom projections, which emit links, those projections need to be recreated and started in the target database, so they can recreate all the links.

Executing the migration

Event Store provides a tool that allows you to replicate events between two clusters or instances. The tool is called Event Store Replicator, and it has its own documentation websiteopen in new window.

WARNING

Event Store Replicator is an Open Source Software, provided as-is, without warranty, and not covered by the EventStoreDB support contract that you might have.

Deployment

You need to run the replication tool on your own infrastructure. The primary condition is that the replicator must be able to reach both source and target EventStoreDB clusters. For example, if you replicate from a self-hosted cluster in AWS to Event Store Cloud in AWS, you'd need to peer between the VPC of the self-hosted cluster and the Event Store Cloud network. We provide detailed instructionsopen in new window about running the replicator in Kubernetes and using Docker Compose.

For the cloud migration scenario, the simplest case that involves no filtering (except scavenge) and transformations, you can use the following configuration:

replicator:
  reader:
    connectionString: ConnectTo=tcp://admin:changeit@my-instance.acme.company:1113; HeartBeatTimeout=500; UseSslConnection=false;
    protocol: tcp
  sink:
    connectionString: esdb+discover://username:[email protected]:2113
    protocol: grpc
    partitionCount: 1
    bufferSize: 1000
  scavenge: false
  transform: null
  filters: []
  checkpoint:
    path: "./checkpoint"
1
2
3
4
5
6
7
8
9
10
11
12
13
14

As the replication process runs continuously until you stop it, you can test the source cluster data and gradually move read-only workloads to it, like subscriptions. When you confirm that everything looks fine from the target database, you can move all the other workloads to the new cluster.

Example scenario

Here are the steps, which you can perform to migrate in one go:

  • Configure and deploy ES Replicator
  • Wait until it gets in to the restart loop after all the historical events are replicated
  • Stop all the workloads, which write to the source database
  • Ensure all the remaining events are replicated, then stop the replicator
  • Ensure that all your subscriptions processed all the events in the source database
  • Record all the necessary checkpoints, or have the ability to subscribe from now in your subscriptions
  • Move workloads with subscriptions to the target cluster
  • Move workloads that append events to the target cluster

Another option is to move the subscriptions first:

  • Configure and deploy ES Replicator
  • Wait until it gets in to the restart loop after all the historical events are replicated
  • Stop all the workloads, which write to the source database
  • Stop the subscription workload, and find the corresponding checkpoint value in the target database (stream position or global position in $all)
  • Migrate the subscription workload to the target cluster, using the new checkpoint

As the replication process will continue endlessly, you can move some of the subscriptions first, ensure that everything works as expected, then continue by moving more subscriptions as well as workloads, which append events.

More information

Find out more about replicator features, limitations, as well as deployment guidelines in the documentationopen in new window.

If you experience an issue when using Replicator, or you'd like to suggest a new feature, please open an issue in the GitHub projectopen in new window.

Connecting to cloud Kubernetes

Below, you can find instructions for connecting workloads running cloud-managed Kubernetes clusters to managed EventStoreDB clusters running in Event Store Cloud.

AWS Elastic Kubernetes Services

On this page, you find instructions how to set up an AWS Elastic Kubernetes Services (EKS) cluster, so it can connect to an EventStoreDB cluster in Event Store Cloud. As a prerequisite, you have experience with Kubernetes, AWS and networking in Kubernetes, as well as in AWS cloud platform.

EKS clusters require at least two subnets, which are connected to internet using an Internet Gateway. Both subnets must have the auto-assign public IP setting enabled, otherwise the node group won't get properly provisioned.

Before you provision a cluster in Event Store Cloud, you need to have a network, to which the cluster nodes will connect. Nodes in the cluster will get IP addresses from the specified network CIDR block.

You can find more information about the steps needed for provisioning Event Store Cloud resources and connecting them to your own Azure account in the provisioning section.

In this example, we'll use the following network configuration:

  • Event Store Cloud AWS network with IP range 172.29.98.0/24 (same as we used in the provisioning guidelines)
  • VPC in the same region (eu-central-1) with IP range 172.16.0.0/16
  • Two subnets in the VPC with ranges 172.16.0.0/18 and 172.16.64.0/18, which are both part of the VPC IP range

The AWS VPC has a peering connection established with the Event Store Cloud network, as described in the provisioning guide. For the peering link, we used the whole VPC IP range 172.16.0.0/16:

ESC peering

Now we can provision the EKS cluster. In the networking configuration section of the new cluster, we need to choose the VPC, which is peered with Event Store Cloud:

EKS networking

After creating the cluster, you need to add the node group, as usual. Each node will get a network interface per subnet of the EKS cluster, so in our case nodes will be attached to two subnets.

When all the deployments are completed, and you added the EKS cluster to your local config, you can try deploying an ephemeral workload using the busybox container image, so you can test the connectivity:

$ kubectl run -i --tty --rm debug --image=busybox --restart=Never -- sh
1

If you run ifconfig in the pod, you will see that the pod got an IP address from one of the subnets:

/ # ifconfig
eth0      Link encap:Ethernet  HWaddr 66:93:89:8F:D7:CF
          inet addr:172.16.101.19  Bcast:0.0.0.0  Mask:255.255.255.255
          UP BROADCAST RUNNING MULTICAST  MTU:9001  Metric:1
          RX packets:12 errors:0 dropped:0 overruns:0 frame:0
          TX packets:7 errors:0 dropped:0 overruns:0 carrier:0
          collisions:0 txqueuelen:0
          RX bytes:1252 (1.2 KiB)  TX bytes:640 (640.0 B)
1
2
3
4
5
6
7
8

Then, it should be possible to ping the managed EventStoreDB cluster node from the pod, ensuring that everything works as expected:

/ # ping c1ut3oto0aembuk4mi6g.mesdb.eventstore.cloud
PING c1ut3oto0aembuk4mi6g.mesdb.eventstore.cloud (172.29.98.112): 56 data bytes
64 bytes from 172.29.98.112: seq=0 ttl=63 time=1.049 ms
64 bytes from 172.29.98.112: seq=1 ttl=63 time=0.716 ms
64 bytes from 172.29.98.112: seq=2 ttl=63 time=0.713 ms
1
2
3
4
5

At this moment, any workload deployed to the EKS cluster should be able to connect to the Event Store Cloud managed EventStoreDB cluster.

Google Kubernetes Engine

On this page, you find instructions how to set up a Google Kubernetes Engine (GKE) cluster, so it can connect to an EventStoreDB cluster in Event Store Cloud. As a prerequisite, you have experience with Kubernetes, GKE and networking in Kubernetes as well as in Google Cloud Platform (GCP).

Before you provision a cluster in Event Store Cloud, you need to have a network, to which the cluster nodes will connect. Nodes in the cluster will get IP addresses from the specified network CIDR.

In order to be able to work with the cluster, you need to establish a connection between the Event Store Cloud network and your own VPC Network in Google Cloud. You do it by provisioning a network peering between those two networks.

You can find more information about the steps needed for provisioning Event Store Cloud resources and connecting them to your own GCP project in the provisioning section.

Planning IP ranges

The challenge is to set up IP ranges for both VPCs, the GKE cluster, and the peering in a way that pods running in Kubernetes would be able to reach the EventStoreDB cluster in Event Store Cloud.

GKE and ESC topology

When creating the Standard GKE cluster from GCP Console, the Networking section has the Advanced networking options subsection. There you find the Pod address range setting. It is available for clusters with any type of routing (static routes or VPC-native).

GKE network settings

If the Pod address range option is left blank, the cluster will get a private IP range for the pods. For example, the cluster with static routing got the 10.120.0.0/14 CIDR block for the pods:

GKE network settings

When using VPC-native routing, this new range would be added to the selected VPC network subnet, in addition to the main IP range.

The issue that you'll experience when leaving the pod IP range blank and letting the provisioner to define it for you, is that IP range won't be a part of the configured network peering IP range in Event Store Cloud. For the current example, the subnet-esc has the IP range 172.30.0.0/16 and that's what we used when creating the peering as described in our documentation. As the new pod address range (10.120.0.0/14) is not part of the IP range known to the peering, those pods won't be able to connect to the EventStoreDB cloud cluster.

It could be solvable when using the VPC-native routing for the GKE cluster, as the pod IP range would be added to the subnet. However, the currently available Event Store Cloud version only allows you to have one peering with a given subnet, and the peering has only one remote IP range. It means that we can neither add the pods IP range to the existing peering, nor could we create a new peering with this new range.

The issue can be fixed by defining a custom pod address IP range, which is a part of the peering IP range. In our documentation we recommend using your VPN network subnet CIDR block as the Remote Address field value when creating the peering. However, you can specify a larger range, which could include both the main subnet range, and the additional range for the GKE pods.

Example IP ranges

Let's have a look at a working configuration. In this example, we use the following resources:

  • VPC network vpc-esc on the customer's side
  • Subnet subnet-esc within the vpc-esc network with the primary IP range 172.30.0.0/16
  • VPC-native GKE cluster (Standard or Autopilot) with pod address range 172.31.128.0/17

Now, for the Event Store Cloud network peering, we need to find a range, which covers both the subnet default range, and the additional GKE range. In our case, we could use the 172.30.0.0/15 range as it includes both ranges. The 172.30.0.0/15 netmask can be divided as follows:

Subnet addressRange of addressesUsable IPsHosts
172.30.0.0/16172.30.0.0 - 172.30.255.255`172.30.0.1 - 172.30.255.25465534
172.31.0.0/17172.31.0.0 - 172.31.127.255172.31.0.1 - 172.31.127.25432766
172.31.128.0/17172.31.128.0 - 172.31.255.255172.31.128.1 - 172.31.255.25432766

So, here we see that the subnet uses the larger range, and the GKE pod address range uses a smaller range, plus we have one range free for something else.

GKE networking configuration

When provisioning the GKE cluster, we should specify 172.31.128.0/17 as the pod address range in the cluster networking configuration for a new Standard cluster:

GKE network settings

Similarly, the range can be specified for a new Autopilot cluster:

GKE network settings

When the cluster is deployed, you can see that the range is properly assigned:

GKE network settings

When looking at the subnet-esc, we can see those ranges shown in the GCP Console:

GKE subnet

The network peering resource in Event Store Cloud in this case looks like this:

ESC peering

When creating a peering, you don't have to specify a particular subnet of the VPC network, which you peer with. There's no check if the given IP range actually exists in the peered network. Therefore, we can specify the range we need, even if it doesn't match with the primary range of any subnet. By using the larger range, which covers both the primary and secondary ranges, we made the EventStoreDB cluster available for pods in the GKE cluster.

Ensure the connection

To confirm that everything works as expected, you can deploy an ephemeral busybox container to the Kubernetes cluster and try reaching out to the EventStoreDB cloud cluster:

$ kubectl run -i --tty --rm debug --image=busybox --restart=Never -- sh
1

If you don't see a command prompt, try pressing enter.

/ # ping c0brj8qrh41g7drr2i4g-0.mesdb.eventstore.cloud
PING c0brj8qrh41g7drr2i4g-0.mesdb.eventstore.cloud (172.22.110.29): 56 data bytes
64 bytes from 172.22.110.29: seq=0 ttl=63 time=2.655 ms
64 bytes from 172.22.110.29: seq=1 ttl=63 time=1.234 ms
64 bytes from 172.22.110.29: seq=2 ttl=63 time=1.246 ms
1
2
3
4
5

Finally, we can deploy applications to the GKE cluster, which can connect to the Event Store Cloud managed EventStoreDB instances.

The overall network topology would look like this, when we complement the initial diagram with IP addresses and network masks:

ESC GKE topology

Azure Kubernetes Services

On this page, you find instructions how to set up an Azure Kubernetes Services (AKS) cluster, so it can connect to an EventStoreDB cluster in Event Store Cloud. As a prerequisite, you have experience with Kubernetes, Azure and networking in Kubernetes as well as in Azure Cloud platform.

Before you provision a cluster in Event Store Cloud, you need to have a network, to which the cluster nodes will connect. Nodes in the cluster will get IP addresses from the specified network CIDR block.

You can find more information about the steps needed for provisioning Event Store Cloud resources and connecting them to your own Azure account in the provisioning section.

When provisioning a new AKS cluster, you can choose one of the following network configurations:

  • kubenet, which will create a new VNet using default values
  • Azure CNI, which allows you to connect the new cluster to an existing VNet

AKS with Azure CNI

When using the Azure CNI network configuration, you need an existing VNet, or you can configure a new VNet, which will be deployed together with the AKS cluster.

In this example, we'll create the VNet before creating an AKS cluster. The VNet will get the 172.16.0.0/15 IP range, and the default subnet will get the 172.16.0.0/16 IP range, so you have enough IP space for other purposes.

Create a VNet

To be able to work with the cluster, you need to establish a connection between the Event Store Cloud network and your own Virtual Network in Azure. You do it by provisioning a network peering between those two networks as described in the provisioning guide. When creating the peering link, specify the VNet IP range as the remote address.

Peering

Next, when creating the AKS cluster, choose the previously created VNet and the subnet:

AKS networking

With Azure CNI, each pod will get an IP address directly from the VNet subnet range, so all the pods will be able to reach the Event Store Cloud resources using the peering link.

When the AKS cluster is provisioned, you can deploy a workload, and it will be able to connect to a managed EventStoreDB instance.

AKS with kubenet

When creating an AKS cluster with kubenet network configuration, a new VNet will be created in a separate resource group. It is the same resource group where the Kubernetes node pool instances are provisioned. There are no network settings, which you need to change when creating the cluster, except choosing the kubenet configuration.

AKS with kubenet

After all the resources are deployed, you will find a new resource group in the resource groups list. Such a resource group has a name, which starts with MC, for example MC_aks-setup-docs_esc-demo_westeurope. Uou can then open the new resource group and find the VNet there:

Resource group

Open the VNet to find its IP range:

Default VNet

Use this address space to create a new peering link from Event Store Cloud to the AKS VNet. When the peering is provisioned, it will look like this:

Peering

When the peering becomes active, you can deploy a workload to the AKS cluster, and it should be able to reach a managed EventStoreDB instance via the peering link.

Last Updated:
Contributors: Alexey Zimarev, Mathew McLoughlin, oskar.dudycz