

Managing ES Cloud resources
Resizing cluster nodes
Clusters can be expanded on-demand, to accommodate database growth, through the Cloud Console and the Event Store Cloud CLI.
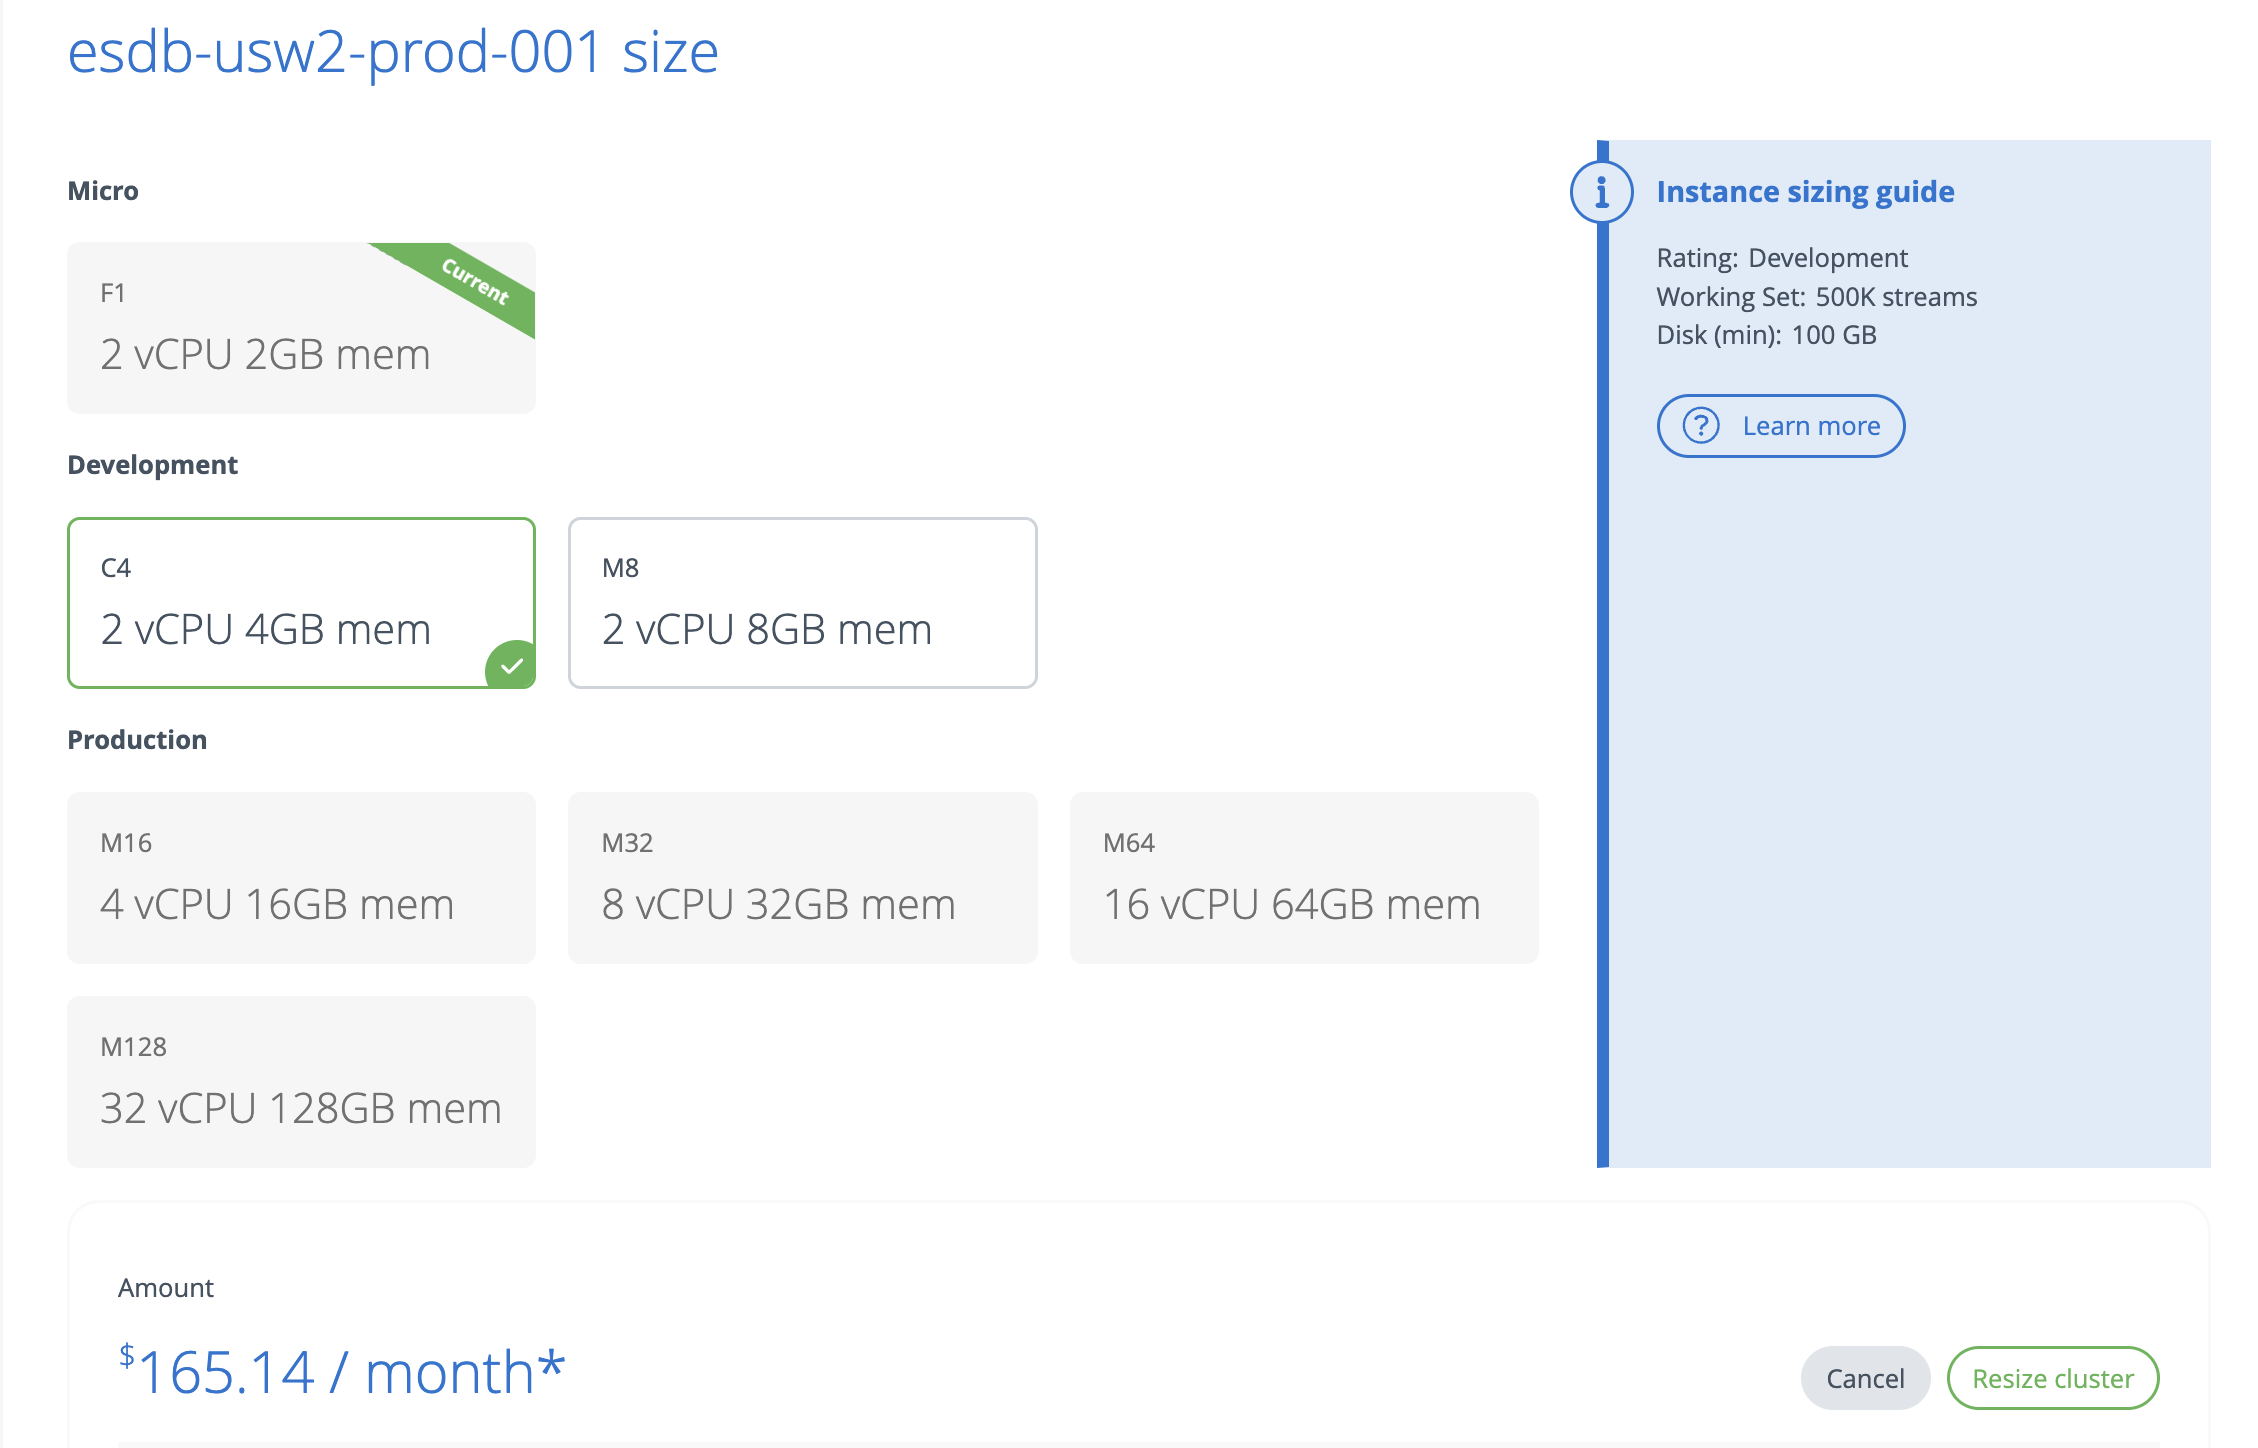
You can choose a larger or smaller node size. See also the cloud sizing guide for general guidance.
To resize a cluster in the console, navigate to the clusters view and select Resize Cluster.
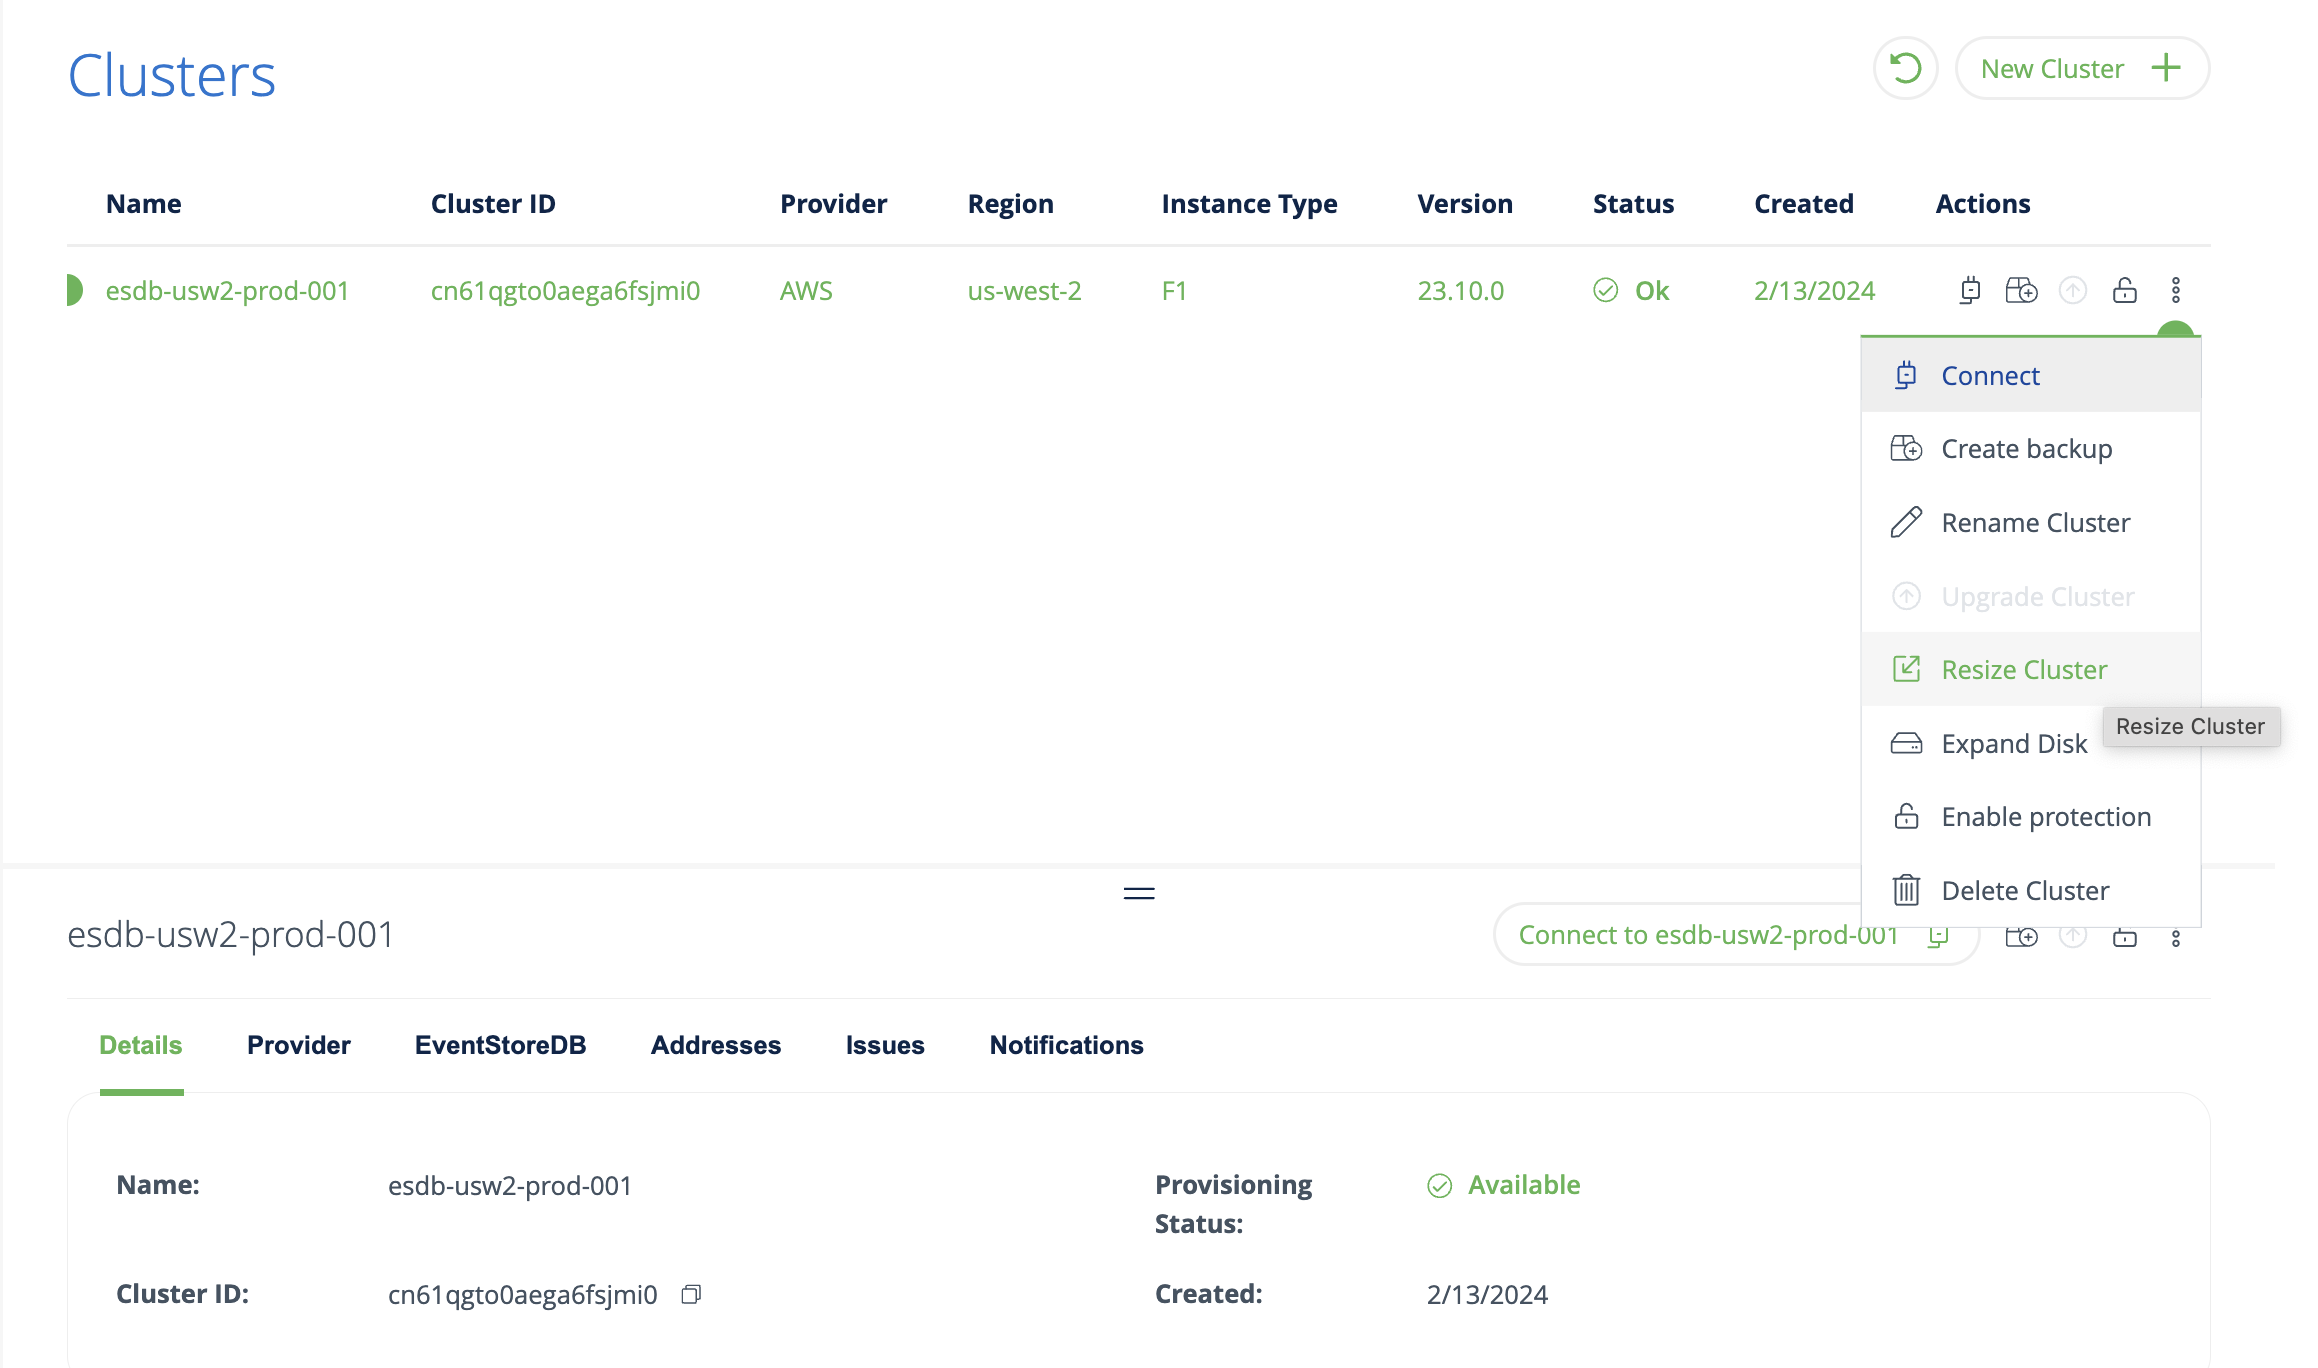
On the detail page, specify the new cluster size and click on Resize Cluster.
Depending on your configuration, downtime may vary. Resizing a single-node ESDB instance requires downtime, while resizing a 3-node cluster uses a rolling upgrade, ensuring zero downtime.
In the cluster view, you can see that the resize is in progress.

Once the resize operation is complete, the new cluster size will show in the cluster view.

To resize a cluster with the command line, use the clusters resize command, where --target_size is the target instance size. Possible values are: F1, C4, M8, M16, M32, M64, M128.
esc mesdb clusters resize \
    --target-size C4 \
    --id cn7dd2do0aekgb8nbf20 \
    --project-id cn62uolo0aegb5icm0bg \
    --org-id 9bsv0s4qu99g029v5560
Upgrading EventStoreDB version
Clusters can be upgraded to a later version on-demand through the Cloud Console and the Event Store Cloud CLI.
Note
Limitations:
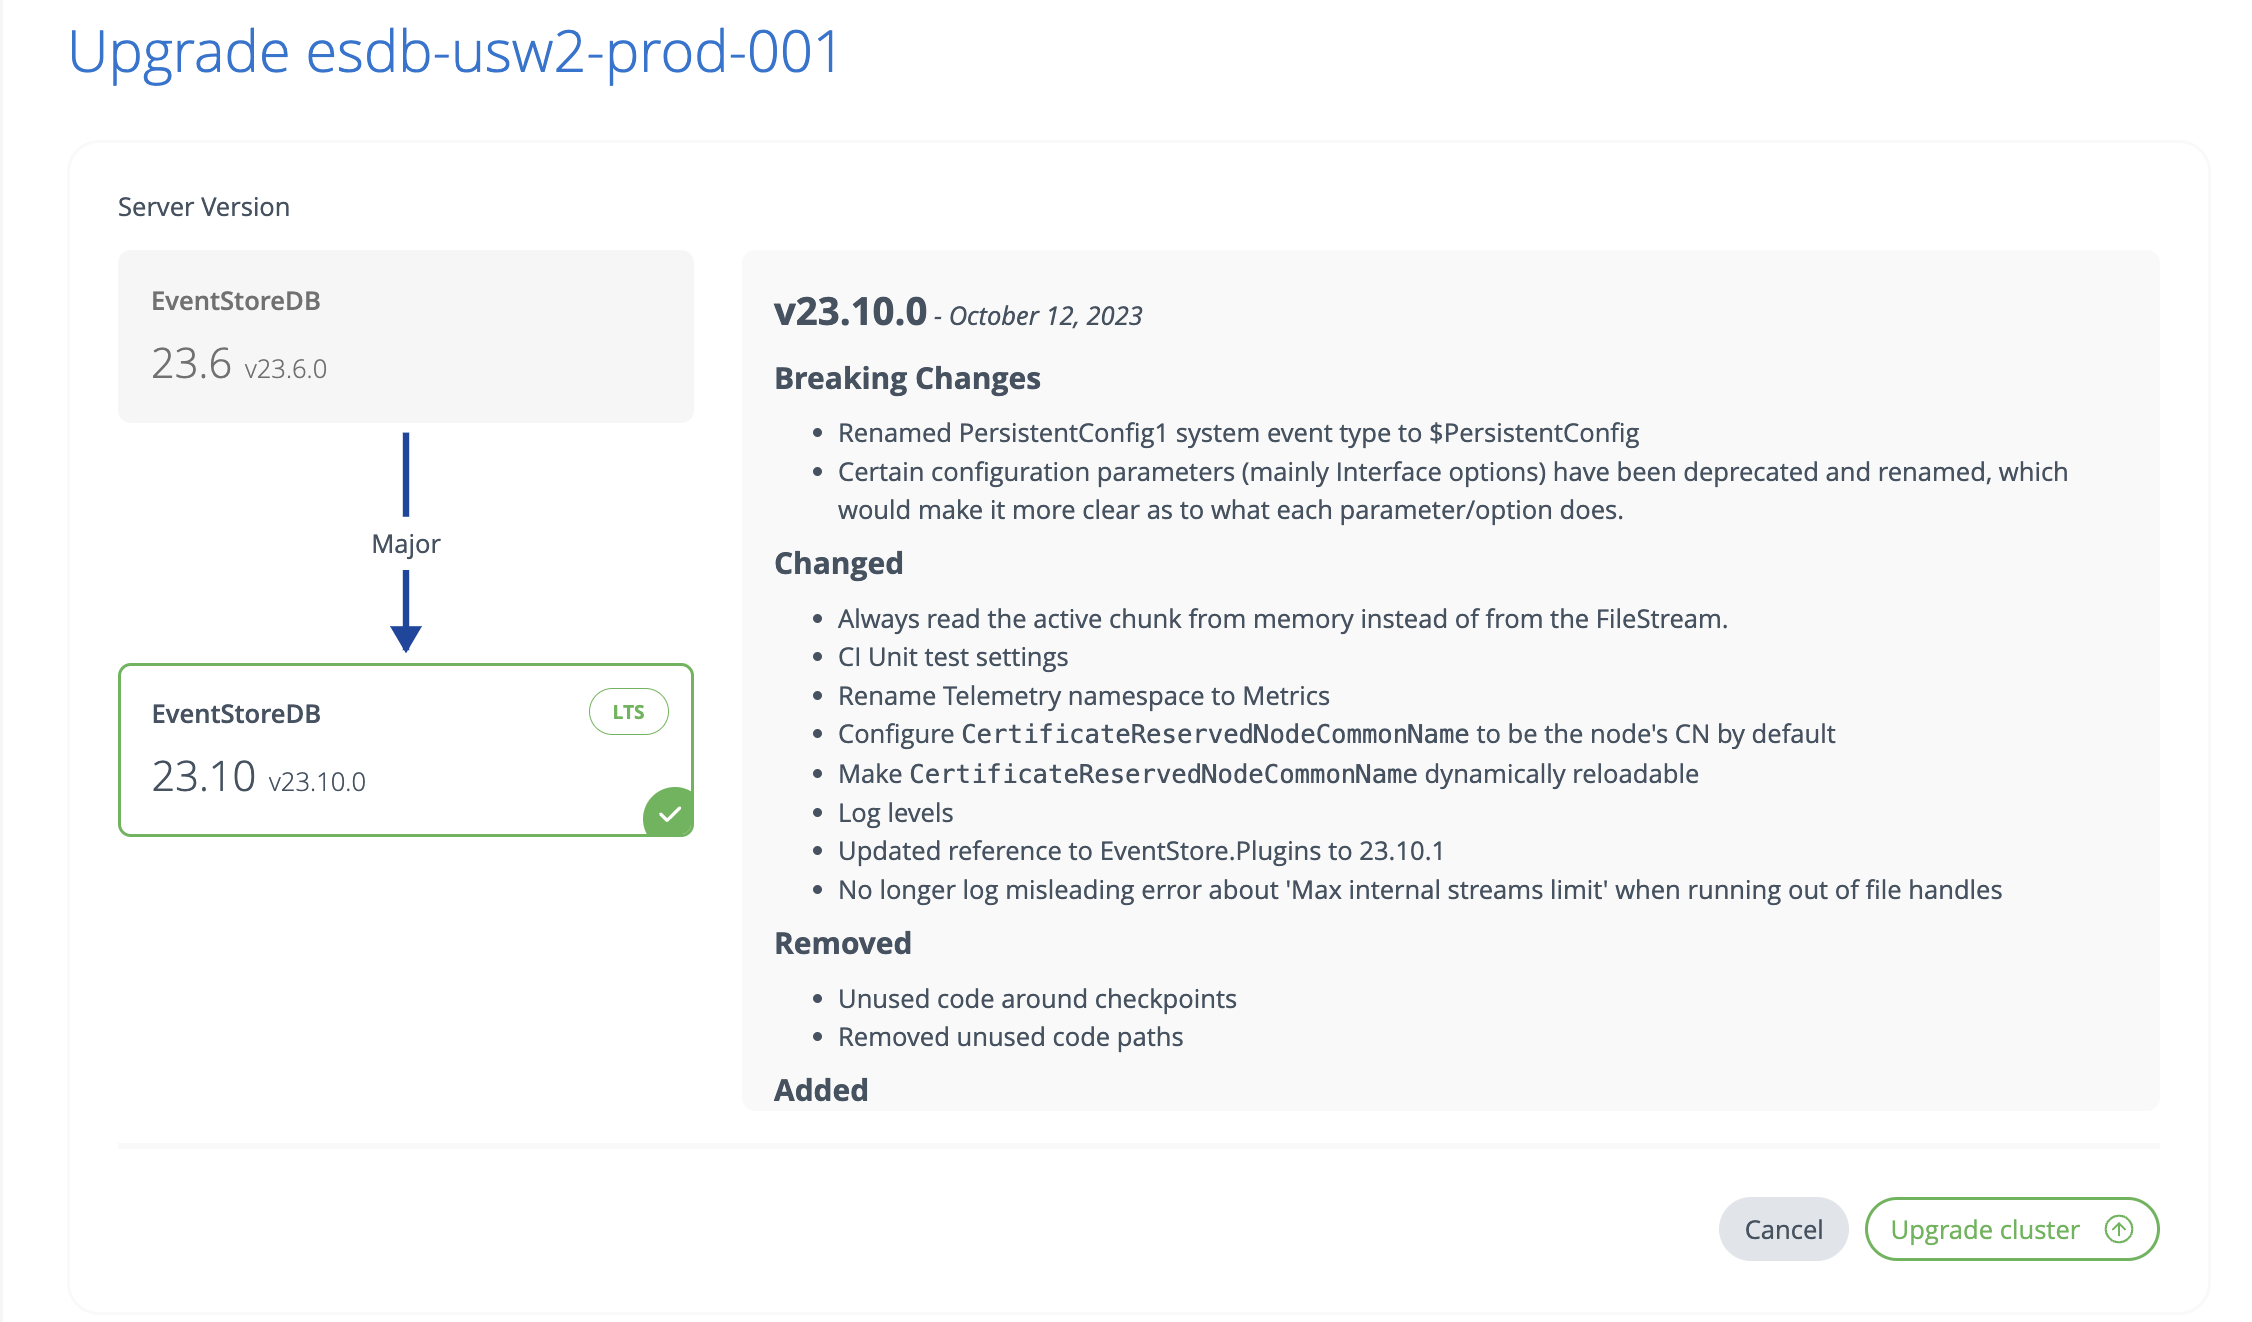
- At this time, clusters can only be updated to a minor version of the current version. Upgrading to a major version is part of a future release. Until that point, if you need to upgrade to a major server version, you should perform a backup and restore to a new cluster. When restoring the backup, you can choose the EventStoreDB version you need. You can then switch your applications over to the connection string for the new cluster.
To upgrade a cluster in the console, navigate to the clusters view and select Upgrade Cluster.
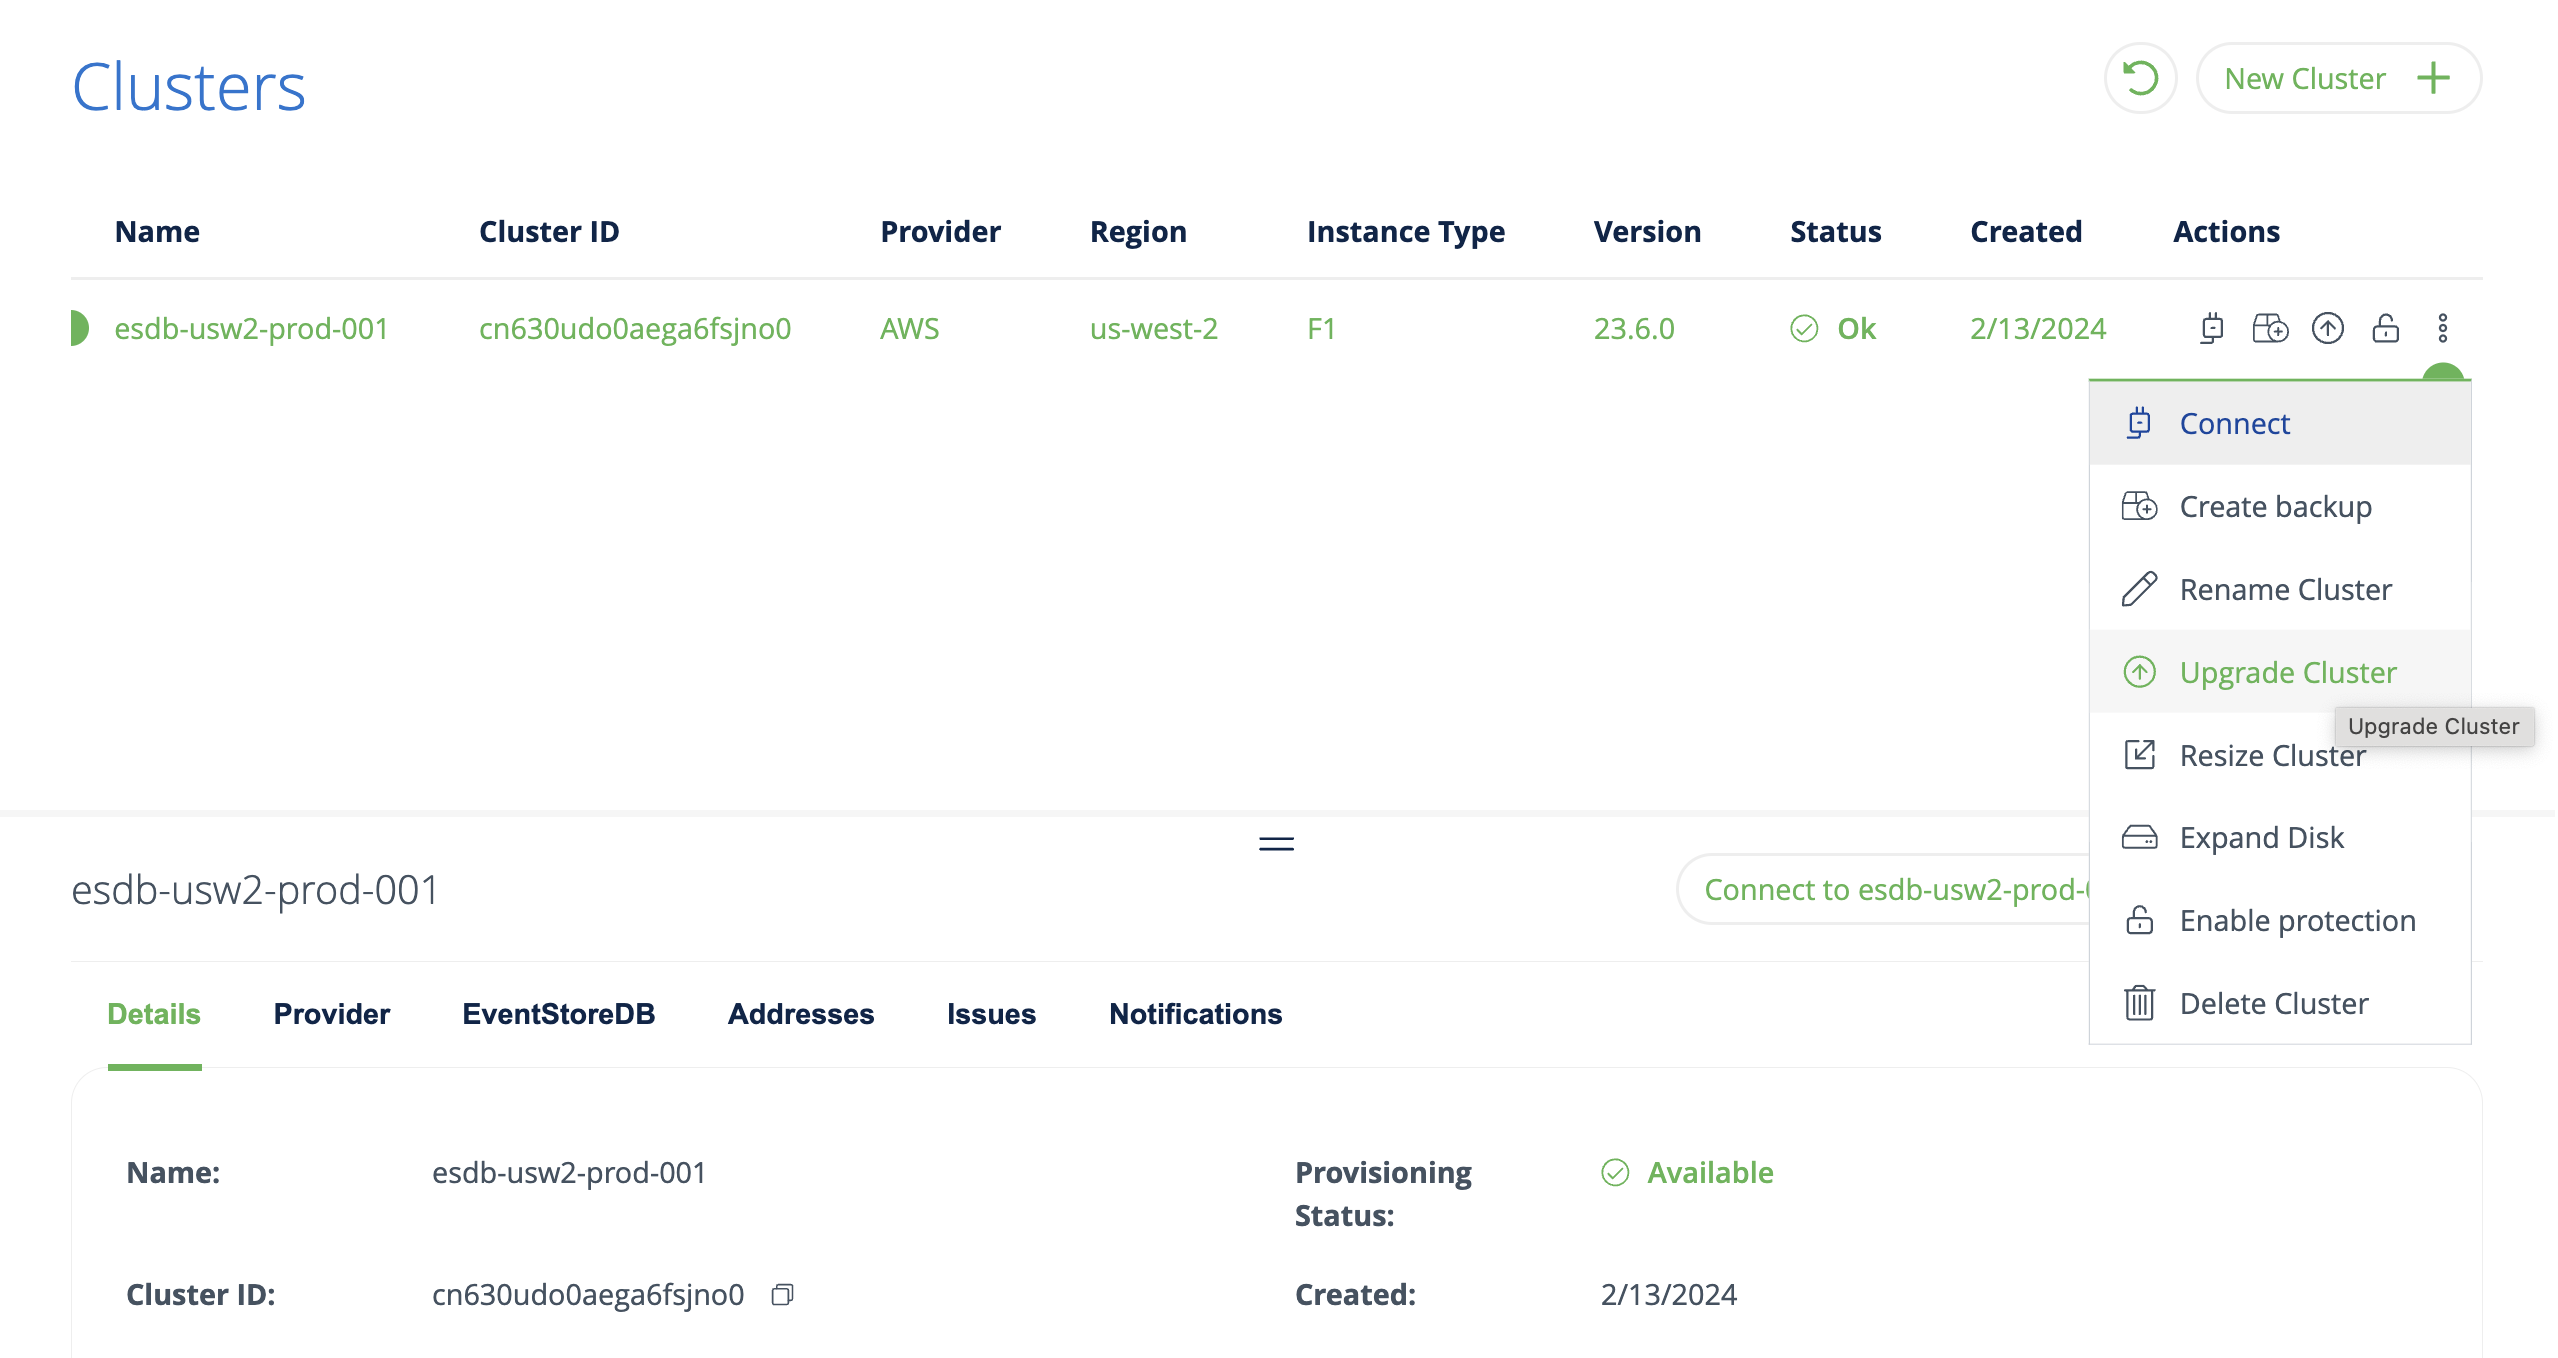
On the detail page, specify the new cluster version and click on Upgrade Cluster.
Depending on your configuration, downtime may vary. Upgrading a single-node ESDB instance requires downtime, while upgrading a 3-node cluster uses a rolling upgrade, ensuring zero downtime.
In the cluster view, you can see that the upgrade is in progress.

Once the upgrade operation is complete, the new cluster version will show in the cluster view.

To upgrade a cluster with the command line, use the clusters upgrade command, where --target_tag is the version you want to upgrade to. This must include the full version, e.g. 23.10.0.
esc mesdb clusters upgrade \
    --target-tag 23.10.0 \
    --id cn7dd2do0aekgb8nbf20 \
    --project-id cn62uolo0aegb5icm0bg \
    --org-id 9bsv0s4qu99g029v5560
Expanding disks
Disks can be expanded on-demand, to accommodate database growth, through the Cloud Console and the Event Store Cloud CLI
See also the cloud sizing guide for general guidance.
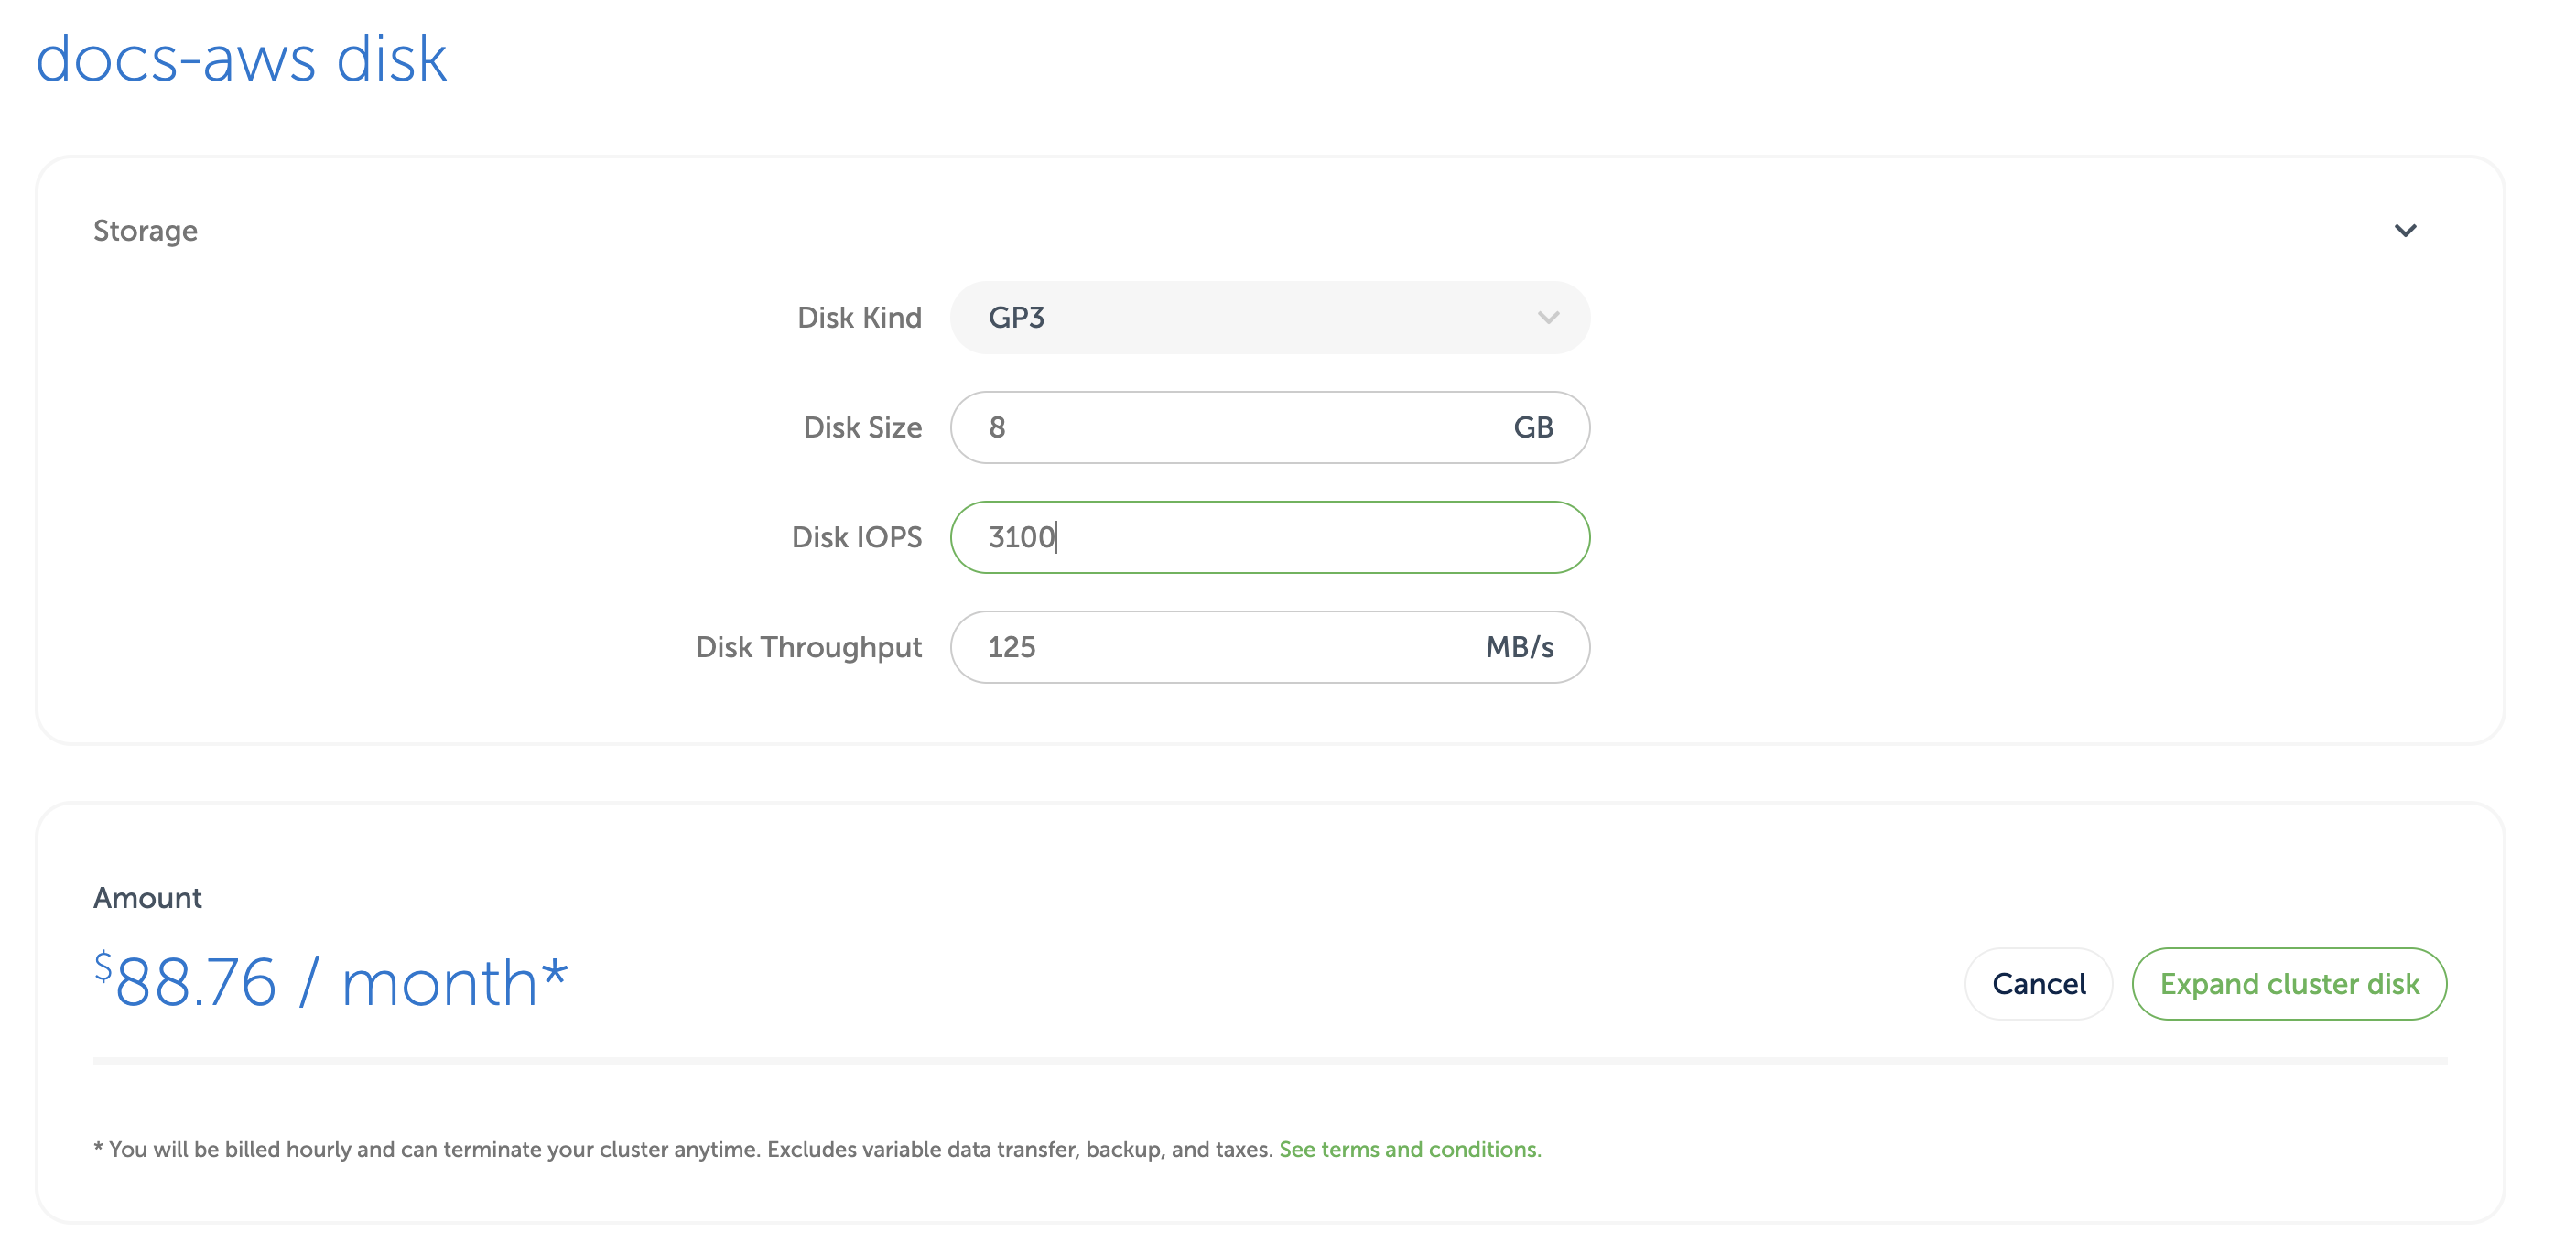
To expand disks in the console, navigate to the clusters view and click on the Expand Disks icon.
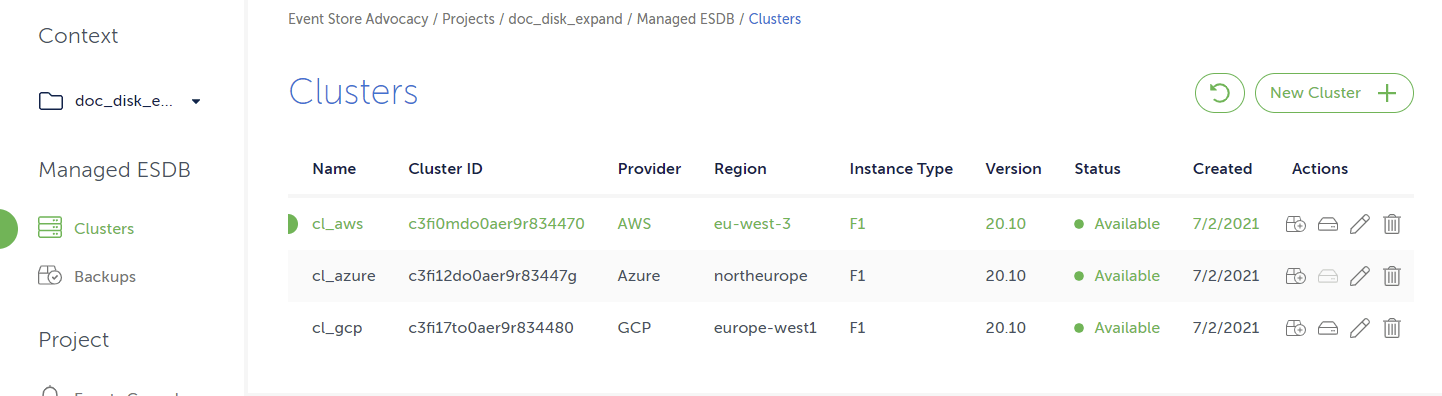
On the detail page, specify the new disk size (as well as the disk IOPS and throughput when using the AWS GP3 disk type) and click on Expand cluster disk.
To expand disks with the command line, use the clusters expand command, where --id is the cluster id.
esc mesdb clusters expand \
    --disk-size-in-gb 16 --id c3fi17to0aer9r834480 \
    --project-id c3fhvdto0aepmg0789m0 \
    --org-id bt77lfqrh41scaatc180
Event Store Cloud Jobs
The Event Store Cloud runs scheduled jobs on the user's behalf. All of these jobs consist of a human-readable description and a schedule.
Currently, the following jobs are supported:
Job Schedules
The schedule format used by the Event Store Cloud CLI tool and API is a simplified subset of cron, in the future we may support more cron features.
The supported subset is:
- for the first field, minute:
- a wildcard
* - a number between
0and59(inclusive). - a rate, written as a wildcard divided by a number. E.g:
*/15
- a wildcard
- For the second field, hour:
- a wildcard
* - a number must be between
0and23(inclusive) - a rate, written as a wildcard divided by a number. E.g:
*/1
- a wildcard
- for the third field, day of month:
- a wildcard
*
- a wildcard
- for the fourth field, month:
- a wildcard
*
- a wildcard
- for the fifth field, day of the week:
- a wildcard
* - a number between
0and7(inclusive), Sunday to Saturday
- a wildcard
 ┌───────────── Minute: wildcard, number (0 - 59), rate
 │ ┌─────────── Hour: wildcard, number (0 - 23), rate
 │ │ ┌───────── Day of the month: wildcard
 │ │ │ ┌─────── Month: wildcard
 │ │ │ │ ┌───── Day of the week: wildcard, number (0 - 7)
 │ │ │ │ │
 * * * * *
Note
Scheduled backups have a minimum frequency of 60 minutes. Currently, it is not possible to schedule backups more frequently.
Examples:
0 */1 * * * runs a job once an hour, at minute 00.
0 12 * * 1 runs a job at 12:00 PM on Monday.
30 13 * * 0 runs a job at 13:30 PM on Sunday.
Manual Backup
Backups can be created on demand using the Cloud Console and the Event Store Cloud CLI.
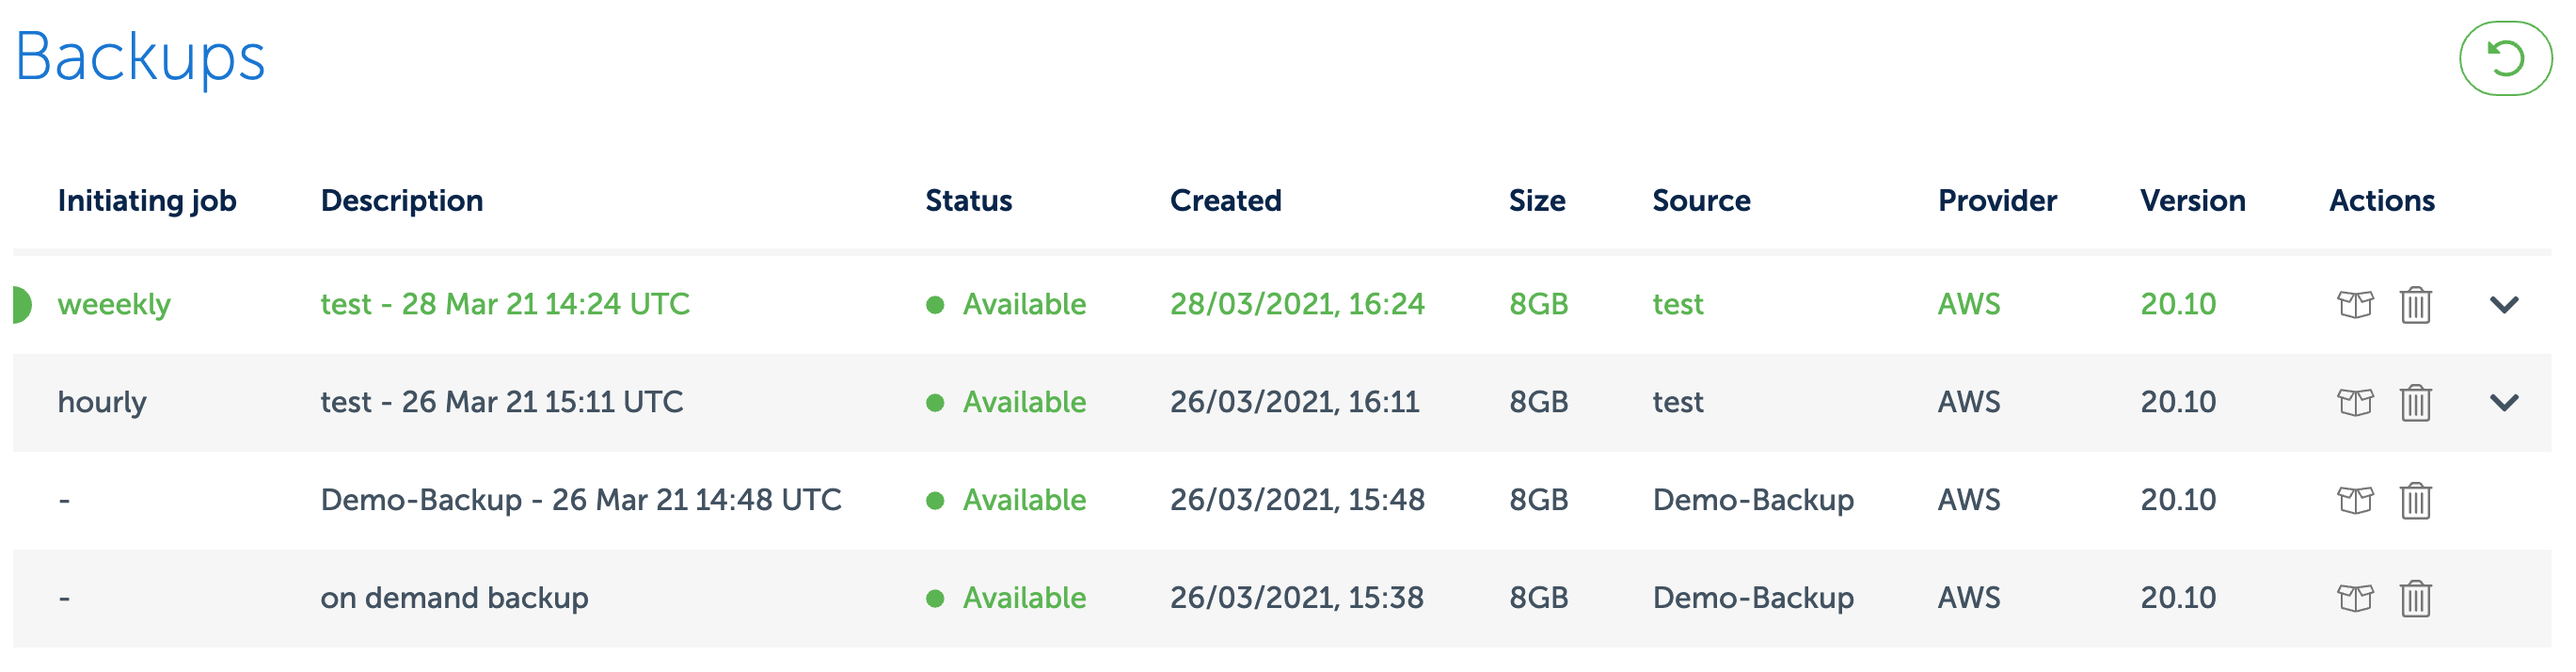
Manually created backups appear in the console alongside backups created by scheduled jobs.
To see the status of the backup, navigate to the Backups section of the console. There you can see all backups created manually or by a scheduled job.

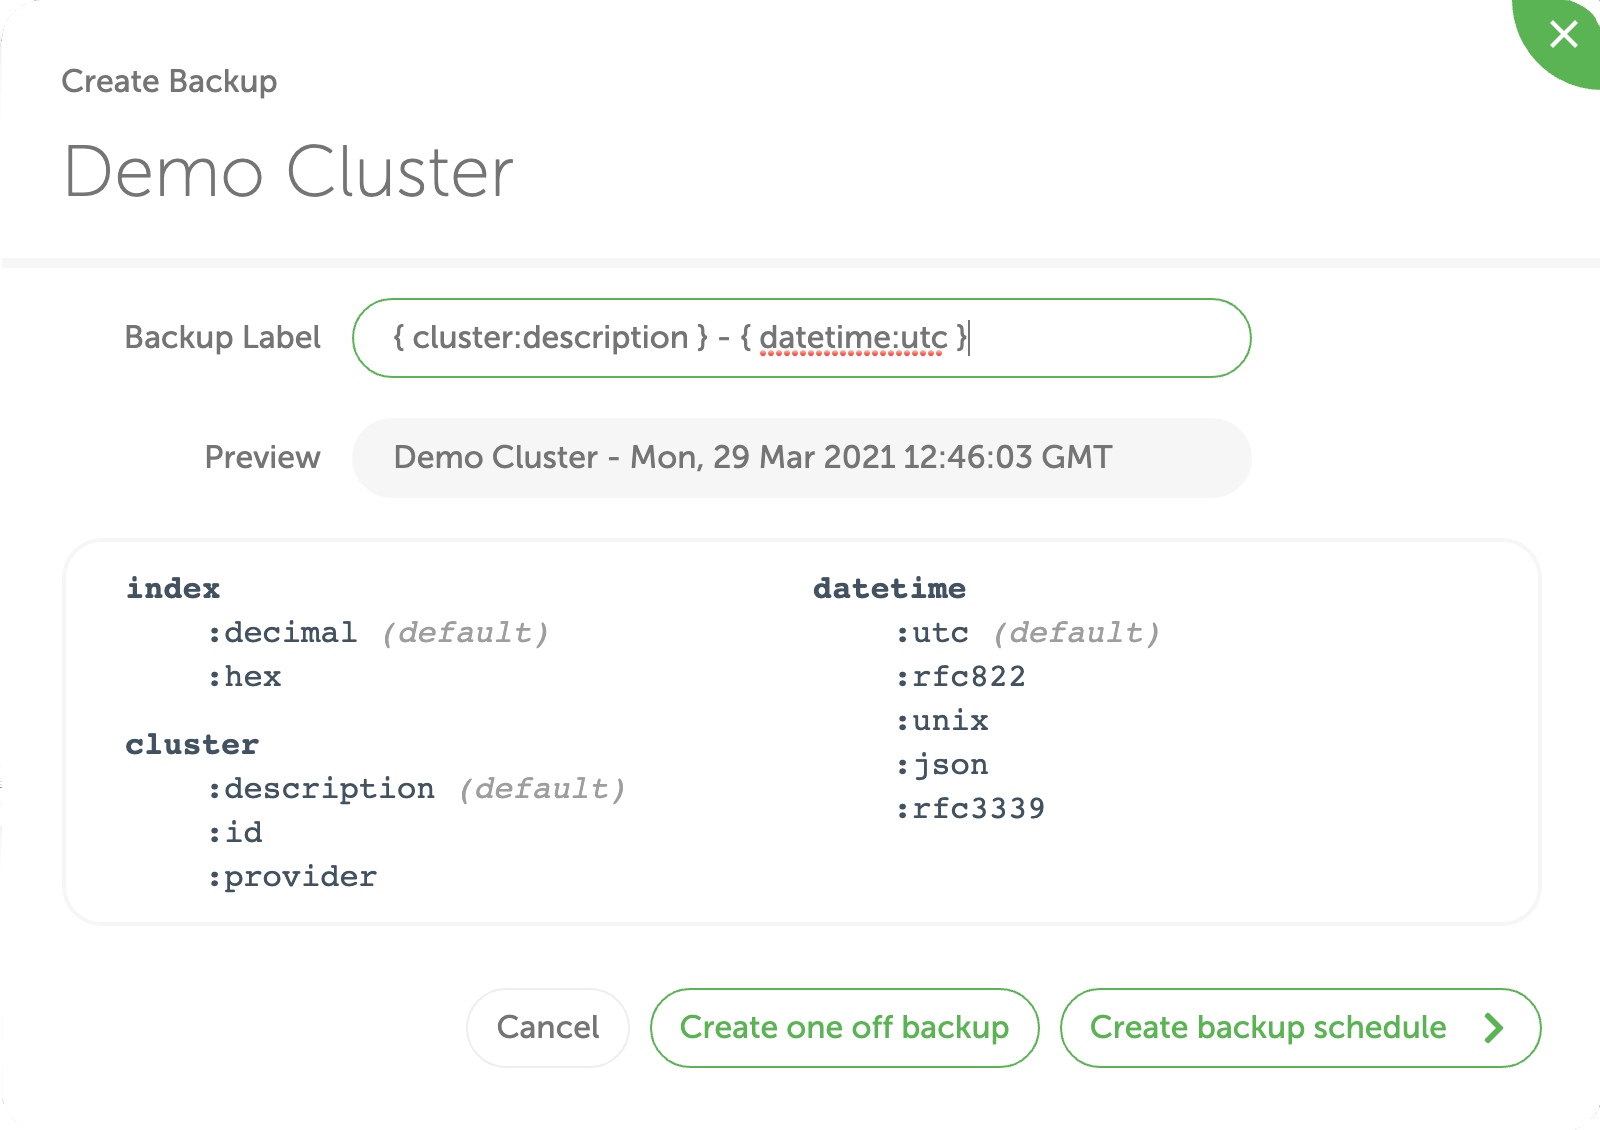
You can customise the backup label using a combination of free-text and predefined variables:
- index—: the auto-incremented value with the number of backups. You can format it as:
- decimal:
index:decimal(default), - hexadecimal:
index:hex.
- decimal:
- cluster: value from the cluster information:
- description:
cluster:description(default), - id:
cluster:id, - cloud provider:
cluster:provider
- description:
- datetime: timestamp of when backup was made. You can format it as:
To create a backup in the console, navigate to the clusters view and click on the Create backup icon. In the popup, click the Create one-off backup button.
To create a backup, use the backups create command:
esc mesdb backups create --description "on demand backup" \
    --source-cluster-id c1eut65o0aeu6ojco7a0 \
    --project-id btfjev2rh41scaatc1k0

BackupId("c1ev3l5o0aeu6ojco7b0")
To see the status of the backup use the backups get command:
esc mesdb backups get --project-id btfjev2rh41scaatc1k0 \
    --id c1ev3l5o0aeu6ojco7b0

Backup { id: BackupId("c1ev3l5o0aeu6ojco7b0"),
project_id: ProjectId("btfjev2rh41scaatc1k0"),
source_cluster_id: ClusterId("c1eut65o0aeu6ojco7a0"),
source_cluster_description: "Demo-Backup",
description: "on demand backup", size_gb: 8,
provider: Aws, region: "eu-central-1",
status: "available", created: "2021-03-26T14:38:12Z",
linked_resource: None }
Scheduled Backups
Scheduled backups can be created through the Cloud Console and the Event Store Cloud CLI
Scheduled backup jobs can be run as frequently as once an hour. After each successful backup, older backups created by the same job will be automatically deleted based on the provided configuration.
Note
Multiple scheduled backups can target the same cluster. However, if schedules overlap, one of the jobs will fail as the first backup job will already lock the cluster.
For example, you could create one scheduled backup that executes every hour, along with a second scheduled backup that executes once a week. Backups from these scheduled jobs are pruned independently regardless of their age, so if both saved a maximum of four backups, the oldest backup from the weekly job might be close to a month old, while the hourly job's backups would never be older than a fraction of a day.
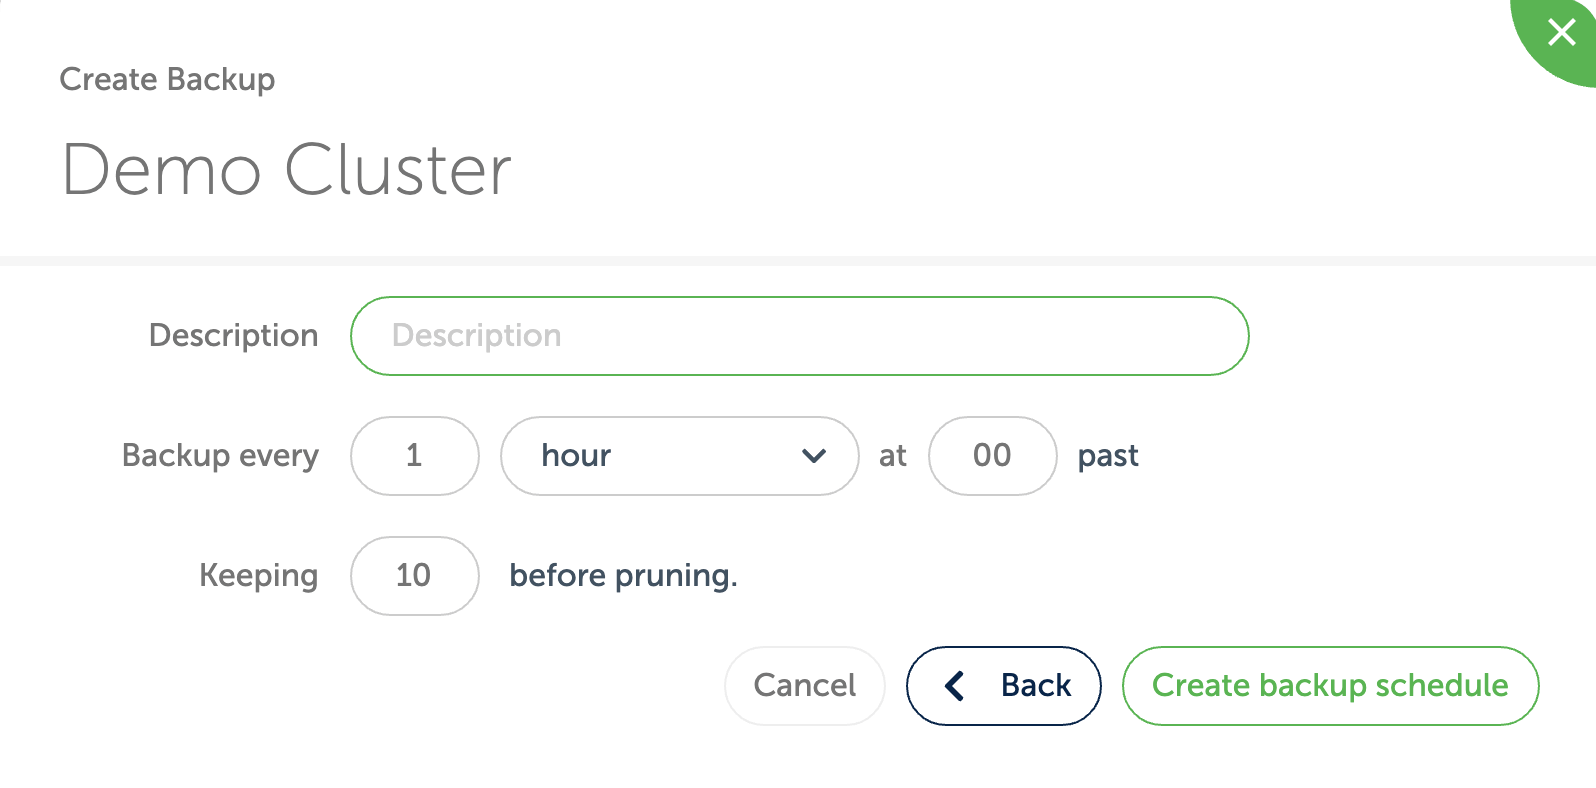
To create a scheduled backup in the console, navigate to the clusters view and click on the create backup icon and then on Create backup schedule.
Choose a description, the frequency as well as the number of backups to keep before pruning. Finally, click the Create backup schedule button.
Backups created this way appear in the console alongside backups created manually. All backups created by the same job will be grouped together in one row, which can be expanded by clicking the down arrow icon on the right side of the row.
To see the status on the scheduled backup jobs, navigate to the Jobs section of the console.
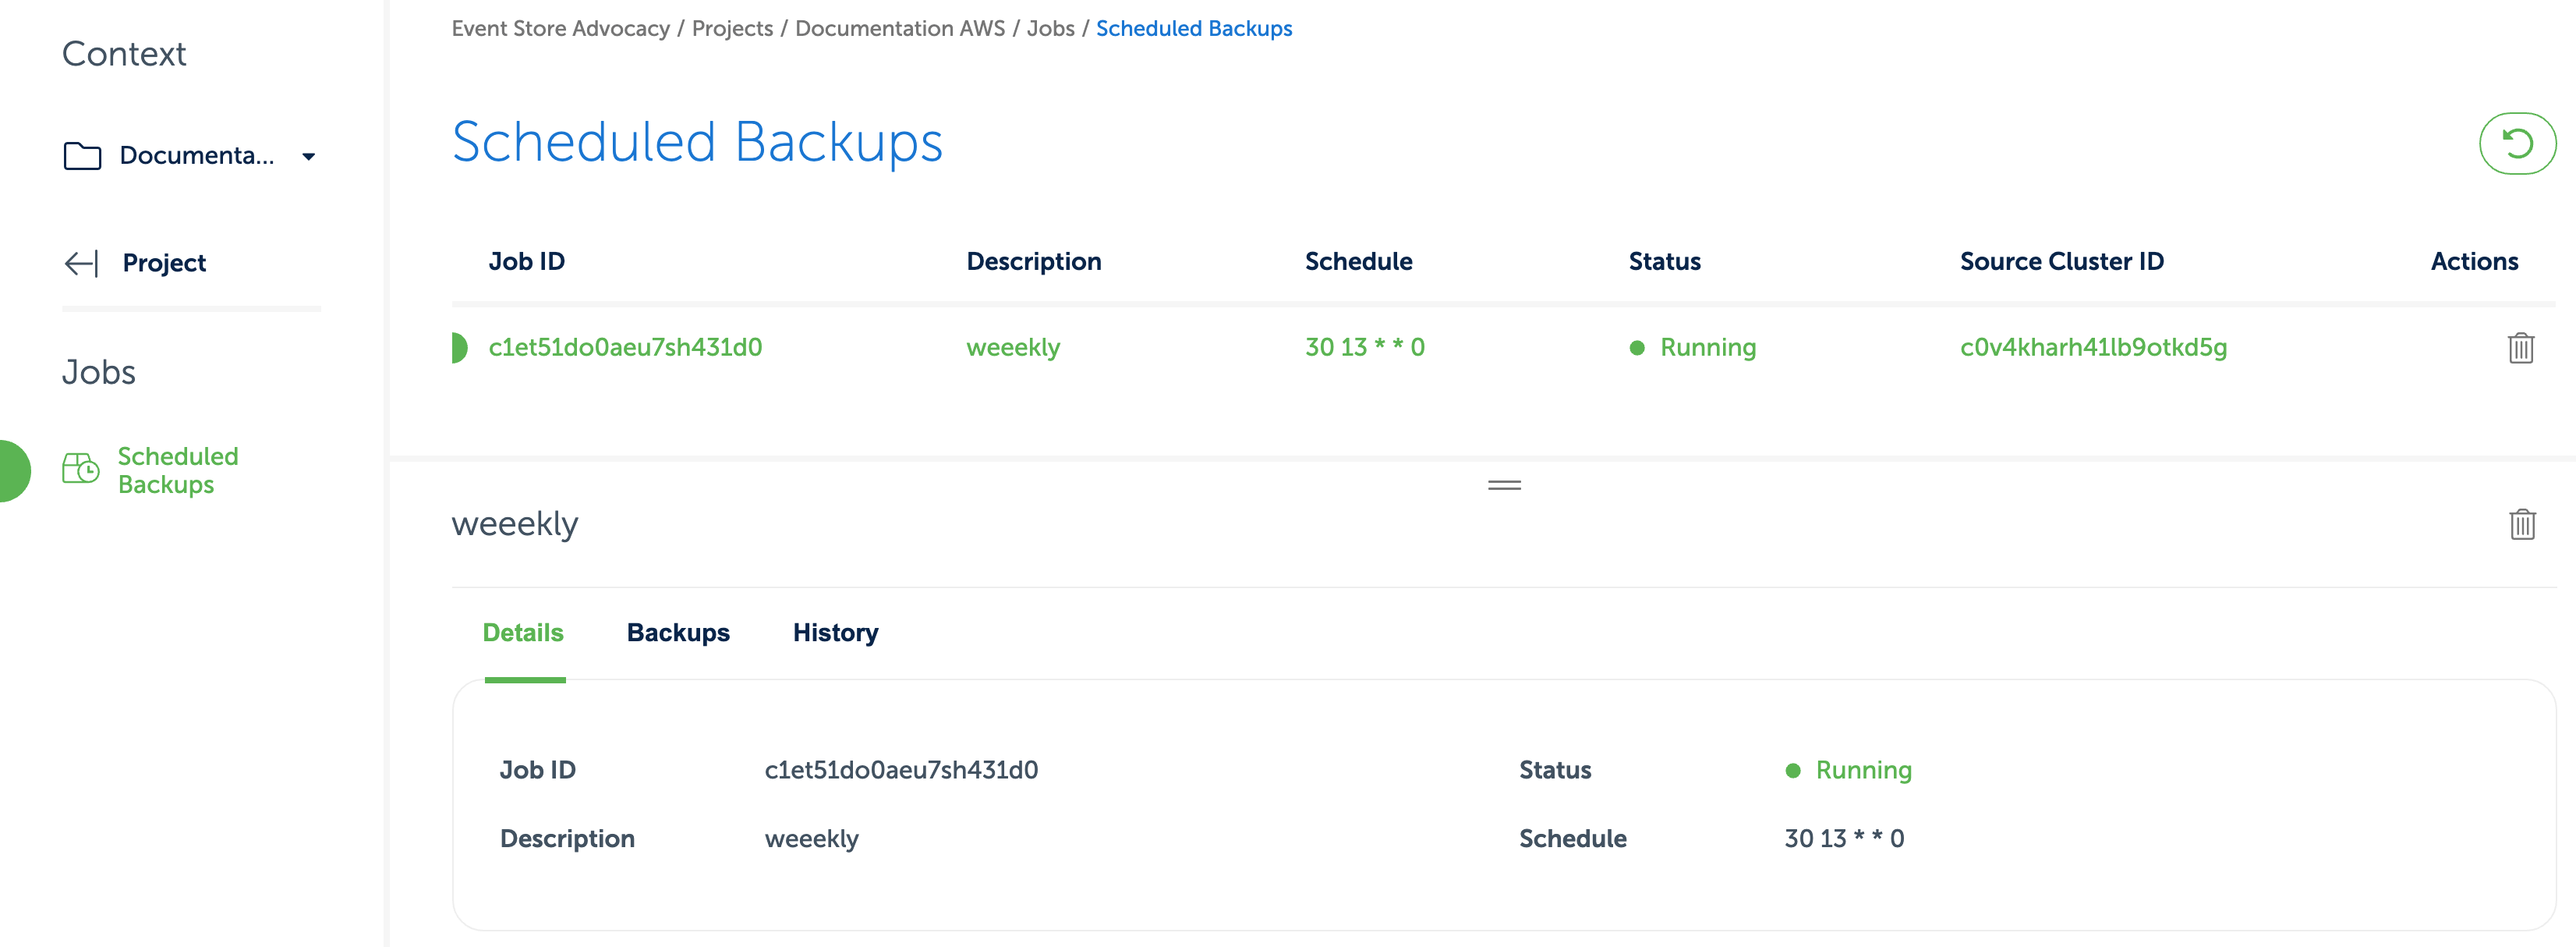
There you can see all backups created by a job, as well as their history, which operations have failed (if any).
Note
A backup might fail, for instance, if a cluster is locked by another operation when the backup tries to run. Such a locking operation could be the disk expand or manual backup.
A scheduled backup can be created using the Event Store Cloud CLI by using the orchestrate subcommand.
The following call will create a new scheduled backup of the cluster with ID c196ogto0aeqohe3ommq:
esc orchestrate jobs create \
    --description 'My Hourly Backup' \
    --schedule '0 */1 * * *' scheduled-backup \
    --description '{cluster} Hourly Backup {datetime:RFC3339}' \
    --max-backup-count 2 \
    --cluster-id c196ogto0aeqohe3ommq
For details on the scheduled field, see Job Schedules.
To list current jobs, run:
esc orchestrate jobs listTo view the history of a job, run:
esc orchestrate history list --job-id <job-id>Restore from backup
Restores can be done on demand using the Cloud Console and the Event Store Cloud CLI.
Note
Restoring a backup will create a new cluster
The topology of the new cluster does not need to be the same as the source of the backup: you can restore a 3 nodes cluster backup to a single node one. Do make sure that the disk size of the target cluster is large enough.
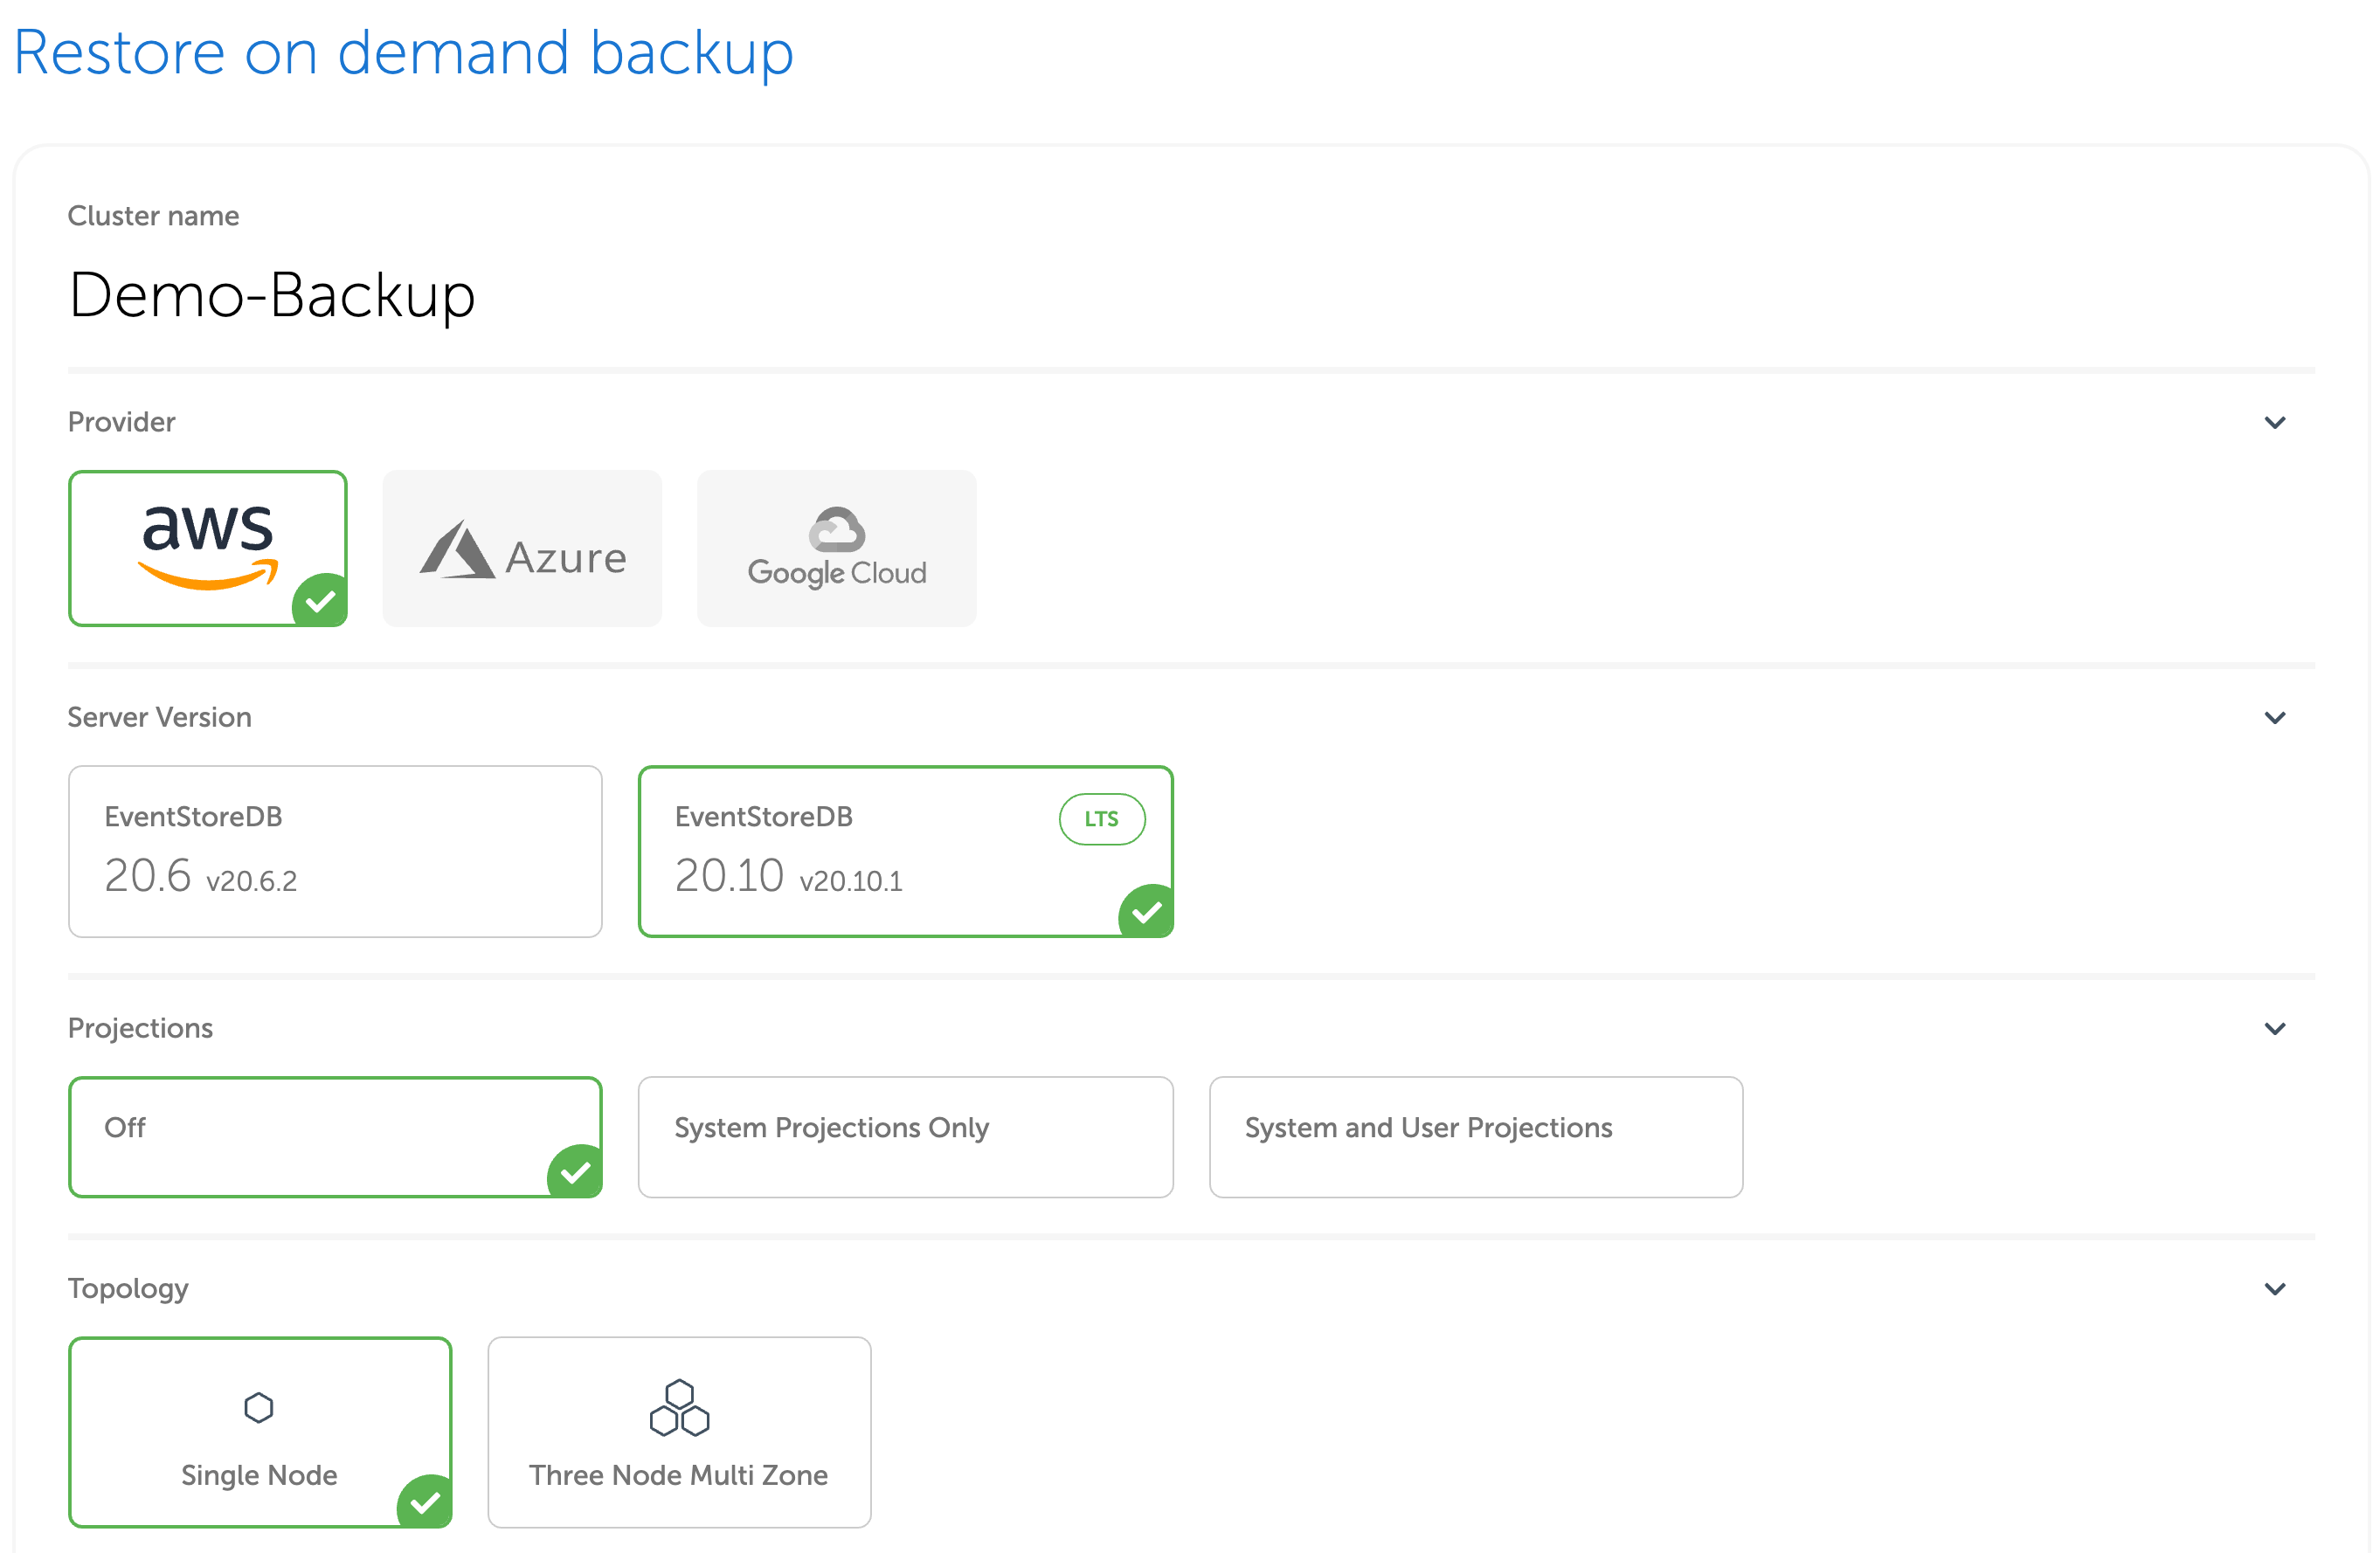
To restore a backup, navigate to the Backups section fo the Cloud Console and click on the Restore icon of the backup you want to restore.
Backups are restored as new clusters. You will be then redirected to the usual provisioning page, where you can choose your cluster parameters. Note that you are not limited to restoring the backup to exactly the same cluster as the cluster for which the backup was taken. You can change the cluster topology, the database software version, and the instance size. You cannot restore between different cloud providers though.
As you cannot restore to the existing cluster, you should use the source-backup-id option of the mesdb clusters create command. When the backup id is provided, the CLI tool will create a new cluster using the provided backup.
Example: restoring the backup with ID c10dvoarh41lb9otkdrg to an F1 single node instance.
$ esc mesdb clusters create \
    --description "restore" \
    --source-backup-id c10dvoarh41lb9otkdrg \
    --instance-type F1 --disk-size-in-gb 10 \
    --disk-type GP2 --network-id c10dr5qrh41lbabqa2j0 \
    --projection-level off --server-version 20.10 \
    --topology single-node  --project-id c10d0h2rh41lba1v92k0
The output will display the new cluster ID:
ClusterId("c1mnqjdo0aembuk4ljo0")You can then get the new cluster status with the following command:
$ esc mesdb clusters get --id c1mnqjdo0aembuk4ljo0 \
    --project-id c10d0h2rh41lba1v92k0 --json
The output will be similar to:
{
    "id": "c1mnqjdo0aembuk4ljo0",
    "organizationId": "bt77lfqrh41scaatc180",
    "projectId": "c10d0h2rh41lba1v92k0",
    "networkId": "c10dr5qrh41lbabqa2j0",
    "description": "restore",
    "provider": "aws",
    "region": "eu-west-2",
    "topology": "single-node",
    "instanceType": "f1",
    "diskSizeGb": 10,
    "diskType": "gp2",
    "serverVersion": "20.10",
    "projectionLevel": "off",
    "status": "available",
    "created": "2021-03-26T09:37:17Z",
    "addresses": {
        "tcp": [
            "c1mnqjdo0aembuk4ljo0.mesdb.eventstore.cloud:1113"
        ],
    "grpc": "esdb://c1mnqjdo0aembuk4ljo0.mesdb.eventstore.cloud:2113",
    "ui": "https://c1mnqjdo0aembuk4ljo0.mesdb.eventstore.cloud:2113"
    }
}
Protecting the cluster from removal
Cluster can be protected from accidental removal using the Cloud Console and the Event Store Cloud CLI.
This feature will require an extra step to unprotect the cluster before it will be possible to remove it.
To protect a cluster, navigate to the clusters view and click on the Protect Cluster icon.
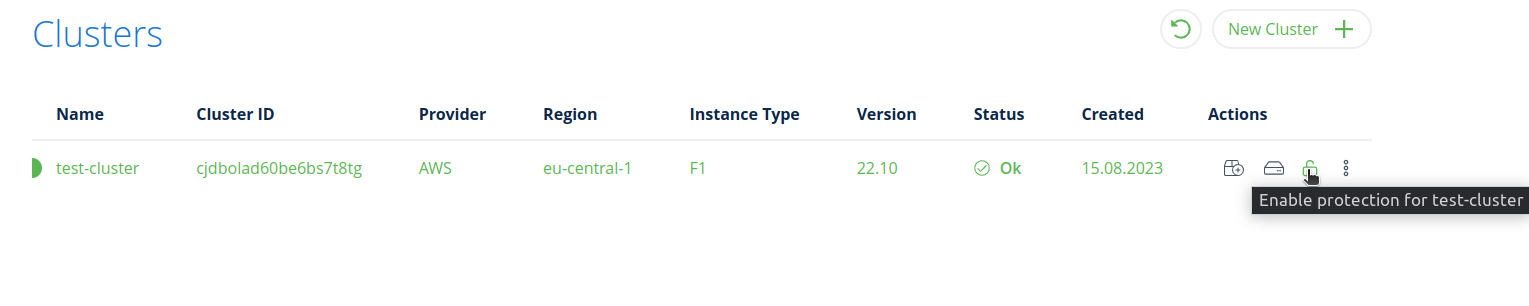
On the detail page click on Enable Protection button.
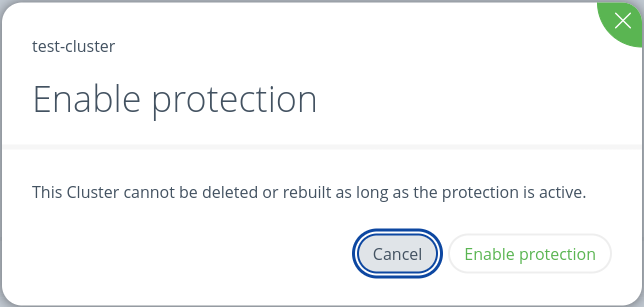
Protected cluster does not have a Delete Cluster active action.
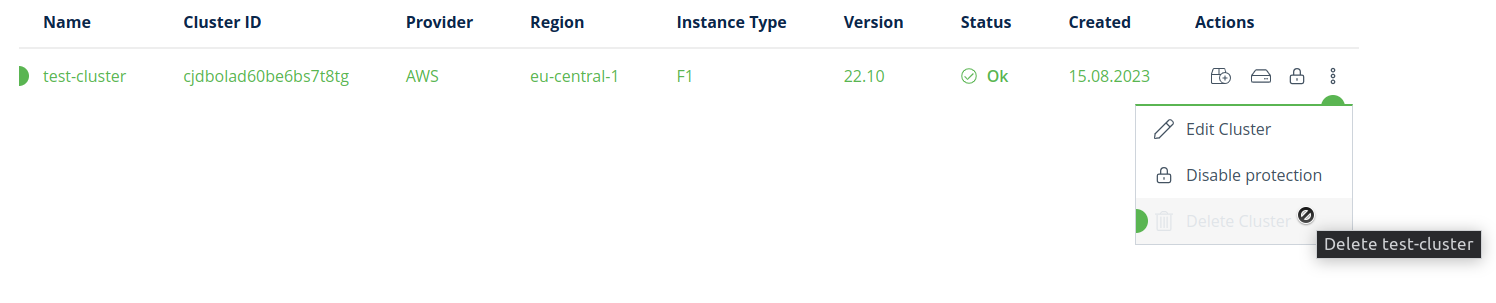
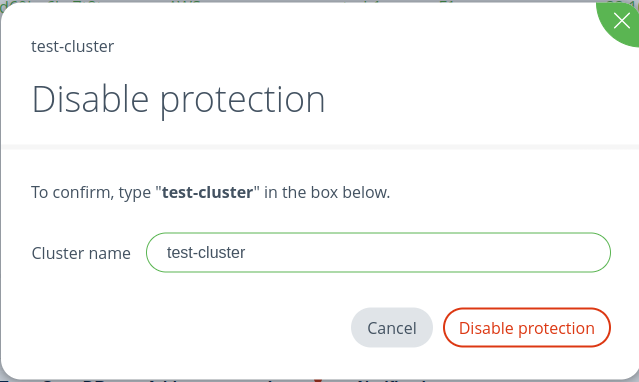
To unprotect a cluster, navigate to Clusters action and click on the Unprotect Cluster icon.
To protect a cluster, you need to update a value of protected parameter to true:
esc mesdb clusters update --id cis4pcid60b5q96r8hm0 --protected trueTo unprotect a cluster, you need to update it to false:
esc mesdb clusters update --id cis4pcid60b5q96r8hm0 --protected false